How to Repair Drywall

The use of drywall as an option to finish the home has taken hold over the last few years. However, the wall is not untouchable. Sometimes it can get damaged and that’s why you need to learn a few repair tricks that will help you along the way. The damages caused on the wall will range. Sometimes you will get smaller cracks that can be fixed. In other cases, you may end up with large holes that will take more time and effort to fix. Either way, you still need to understand a few repair tips.

Well, below are some of the most important ones:

Surface Crack Repair

There is a seamless paper covering found on your siding contractor Orlando, FL. The covering rarely cracks. Most of the time, cracks appear on the seam where two walls meet. Fixing these cracks is quite simple. The easiest option is to fill the crack with a new compound. Once the compound is fully applied, give it time to dry. Smooth the area using sandpaper and you are done.

Nail Pop Repair

Nail pop is one of the most common problems you will have with the wall. It’s usually reported in newer homes. Nail pop is simply a situation where the nail or the nail head protrudes through the tape on the wall. The solution to this is also very simple. The first step is to scrape away the area where the nail is protruding using a knife. Scrape until the screw or the nail is visible. In the end, use a screwdriver or a hammer to drive the nail back into place.

Corner Bead Repair

The outer corners of vinyl siding Orlando, FL are normally reinforced with plastic or in some cases metal edgings. These reinforcements are called corner beads. Although this is rare, sometimes a sharp knock on the beads may cause it to bend, crack, or chip off. To fix this issue, you will need to assess the affected area and ensure it’s an isolated problem. This is because a knock on the beads may cause damages on other parts of the wall too. Once you are sure the issue is isolated, chip off the loose material around the area and fill the resultant hole with the new compound. Allow it to dry and use sandpaper to smoothen it.
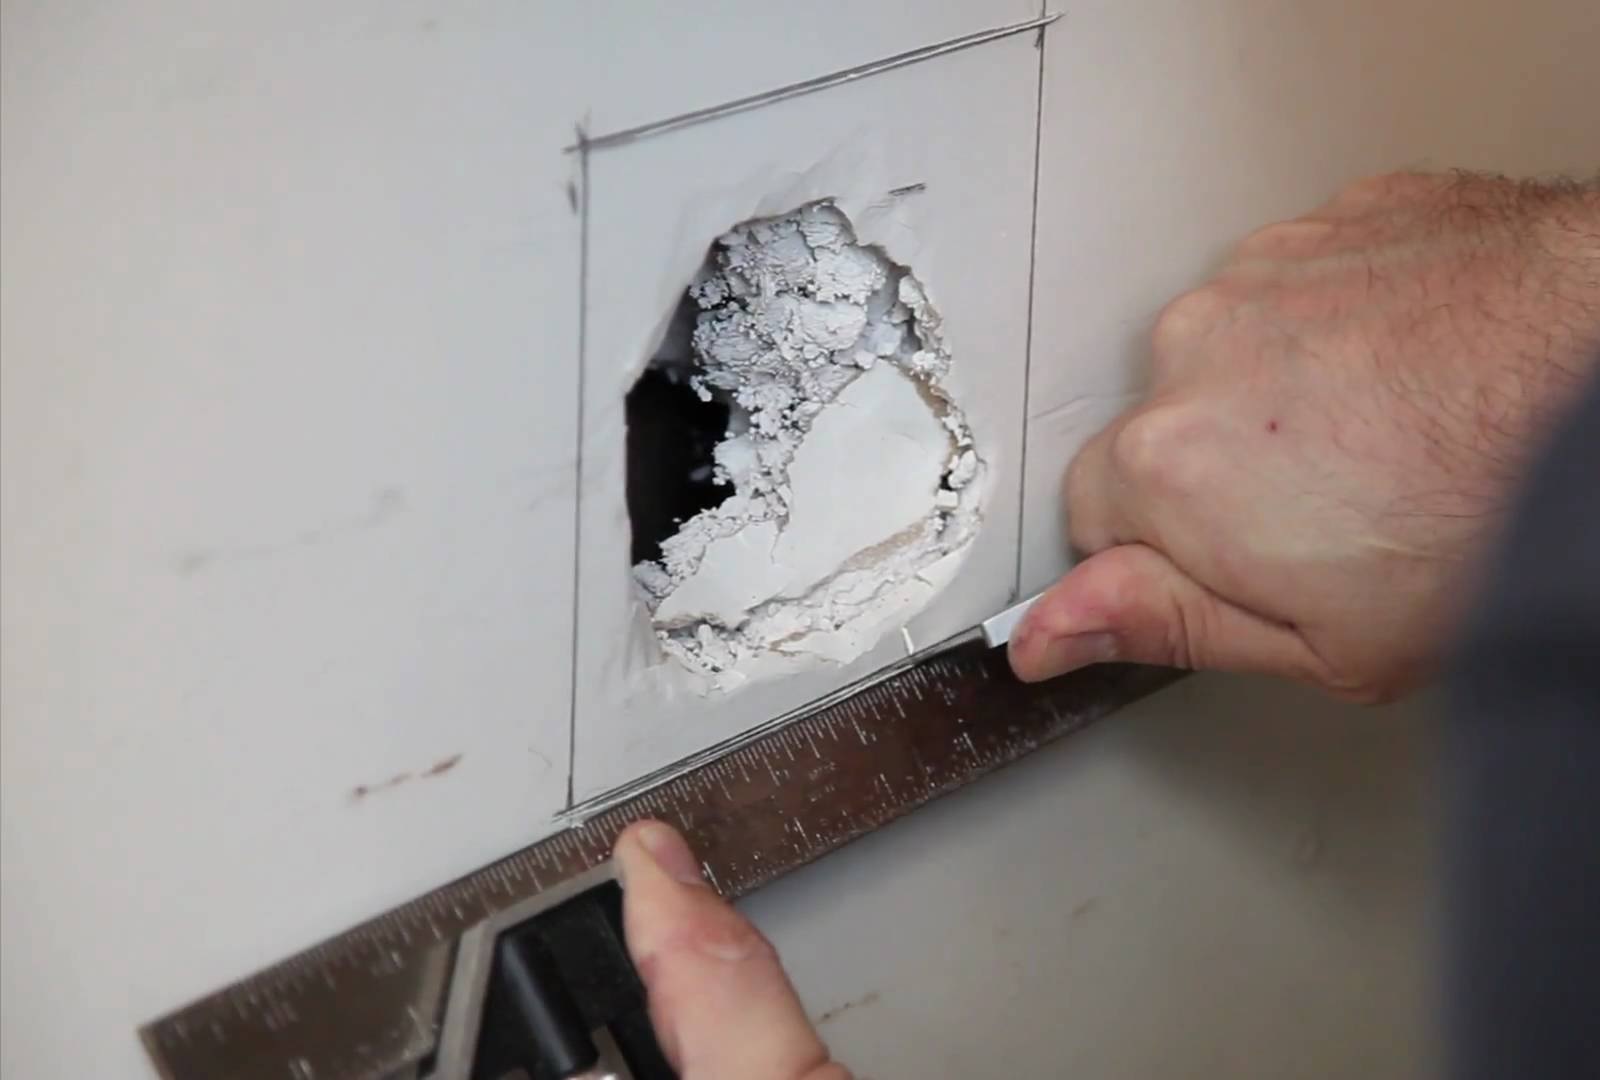
Hole Repair

The approach you will use to fix a hole in the wall will depend on how big the hole actually is. If we are talking about a hole larger than six inches, you will need to use specific patch kits. The kits will be readily available at your local hardware store. If the hole is small, first of all, measure the size. Get a new piece of drywall and cut it out to the exact measurements of the hole that you want to fix. Place the cut-out piece on the hole and reinforce it with fiberglass tape and screws.

The idea of fixing your siding Orlando, FL can often be a challenging task but all you need is a few DIY tips and you are good to go. The simple tips above should come handy.

Tips and Tricks on How to Properly Cut Trees

When cutting trees, there are essential, working techniques that won’t just create a working environment that’s safe for you and your property but will also allow you to work more effectively. In this article, we are going to give you the strategies you can use whenever you decide to do your own tree removal.

Safety First

Although it goes without saying, there’s a need for us to emphasize its importance. You should always wear ear protection, gloves, a hard hat, eye protection, and steel-toe boots when working with a chainsaw. It’s better if you can get your hands on safety chaps. Even if tree trimming seems pretty straightforward, you should always put your safety above all else.

Take Your Time

It’s tempting to cut a couple of trees in one go. However, you must take your time because you need to examine every tree thoroughly before deciding to cut it. This is to ensure that you’re sure of the direction of its fall. Aim to limit your workload. Plan carefully and do not rush the process, so a tree will fall exactly where you want it to.

Don’t Force It

Unless you’re a seasoned logger, you should never force trees to fall in the direction they don’t want to go. When you’re dealing with an “uncooperative” tree, it’s safer if you allow it to drop to the direction it’s inclined to fall. Also, you need to remove the logs off. As for the treetops, move them by hand and place them strategically. If you’re unsure of where a tree is going to fall, stop your tracks and ask for an expert’s opinion.

Stay Sharp

Keep the blade of your chainsaw sharp. This will ensure that you endure the work longer. Getting tired often leads to mistakes. Mistakes when handling a chainsaw may lead to very grave injuries.

Measure the Felling Zone

Trees reach the ground farther than you’d expect them to. They are also much taller than what you might think of them. You can estimate the fall of a tree by using the expert’s ax handle trick. With this strategy, you need to hold the handle of an ax at arm’s length, and then close one eye.

Back away from the tree or move towards it until the topmost part of your ax is even to the topmost part of the treetop. The bottom part of the ax must also be even with the tree’s base. After doing the trick, make a mark to where you are exactly because that’s where the treetop will fall. Keep in mind that this is just an estimate; therefore, you need to allow extra room.

Don’t Work Alone

When it comes to tree services, it’s a good idea to work with a partner. If you have a phone, bring it along with you. If an unfortunate event occurs, it’s always a good idea to be prepared. If you’re just working in your backyard, let your partner check up on you every hour.

Knock Out Rose Fungus

The rose scent. Unfortunately, a quantity of fungi can attacks these fragile blooms. The most frequent in California is powdery mildew, but canker, black spot, rust as well as blights can get rid of a rose-garden. Some illnesses may be avoided using appropriate watering methods and by selecting the correct rose types, while the others respond to the program of fungicides.

Black Place

New leaves with powdery mildew become bumpy before this fungi’s trade-mark grey or white powder-like material seems on the leaves and blossoms. It mars a rosebush attractiveness although powdery mildew will not destroy the plant. Prevent mildew by developing roses in a location with a lot of sunlight and air-circulation. Shrub types, including grandifloras and hybrid tea roses, are resistant to the fungus. Fungicides, including triforine, can stop rather than treat this fungus. Less poisonous preventatives contain jojoba and neem oils.

Canker

An umbrella term to get a quantity of fungi rose leaves and stems with telltale dark lesions that may eventually destroy the plant if not managed. Brand canker turns up as reddish-brown oval spots on rose stems, while stem canker seems in patches that are brownish. The remedy to eliminate canker would be to cut the stem below the fungus and removed it. Cankers can distribute so effortlessly that garden shears needs to be dipped after every use to destroy the fungus.

Black Place

As its title suggests, roses contaminated with black spot fungus develop purplish or black spots on their leaves and stems. It does hurt roses while place does not cause as many issues as fungi in California. Black place enjoys dampness, when you hosing off or are wiping leaves as a result of pests, do so earlier so they’ll dry more rapidly. A nontoxic technique of roses of black spot would be to apply oil or fluid detergent combined with with water and a home-made spray of baking-soda. Spray both sides of the leaves. The baking-soda modifications the leaves’ pH, creating them less hospitable to spot.

Rust

The reddish brown to orange powdery places on underneath of leaves give its title to this fungus. Like fungi, rust thrives in dampness. Dampen the s Oil in the place of the leaves of the rosebush to assist a void this issue, when watering. Fallen leaves needs to be removed to keep rust. In the first spring, use lime or sulfur sulfur to the crops to aid keep rust in balance.

See related

The best way to Repot a Corn Plant

The corn plant (Dracaena fragrans) is an easy care house plant that provides a lush, tropical aura to any room or back yard. The plant has sword- . This corn plant is slow- completely content to be left between waterings and developing. Like the majority of container-grown crops, more room is sometimes needed by corn crops. If completed correctly, moving the plant to bigger digs is not hard.

Select a container, made of any substance, that’s one or two inches greater than the existing residence of the corn plant. Make sure that the container has drainage that is excellent.

Pour one to two inches of potting soil to the new container and moisten with water. Remove the corn plant and shake-off or wash the roots off to eliminate all the aged medium that is expanding.

Place the corn plant in the middle of the container that is new. Check the region of the stem that marks the very top of the former place in the soil of the root ball, and make sure than it did in the first container, the corn plant sits no greater or lower in the pot.

Pour soil to the container to contain the the corn plant in location and moisten the soil. Use planting medium that is clean as opposed to reusing the aged to help keep diseases and increase diet to the corn that is re-potted plant.

Adjust the place, if required, to keep it centered in the pot and in the correct height of the plant. When you water the plant finish filling the pot with potting soil to stopping soil over flow. Smooth the back of a huge spoon or the soil together with the hand trowel.

Before setting the container on leading place tiny pebbles in a plant saucer or alternative drip pan; this raises the humidity round the pan gradually and as the water from your pot fills the drip pan evaporates.

Place the corn plant that is repotted in its unique place in your home or yard. Pick a spot where it is going to receive medium to vivid in direct light if re-locating the plant, remain warm, and be guarded from gusts of wind or drafts.

Mix fluid fertilizer to the water in accordance with label guidelines, then water the recently planted corn plant carefully.

See related

The best way to Fix a Clogged Central Air Conditioning Drain

Many contemporary houses are outfitted with air conditioning techniques. If you’re trying to market your house, maintenance on those systems is essential, particularly. One possible problem that may occur is a drain. The in-door program part generates water residue, or condensate, that has to be drained to the exterior. This condensate to depart the interior is generally allowed by a pipe extending from the exterior wall of the home, but nevertheless, it may become clogged with buildup. An easy clog removal process allows one to have an adequately operating program for a sale as well as house inspection.

Locate the drain line on the the surface of the house. This line is usually positioned near or behind the exterior air-conditioning device; it’s usually a black or white PVC (poly vinyl chloride) pipe extending in the wall.

Remove the cover in the access hole on the drain line using a wrench. Each pipe may have a cover kind that is different depending on the installation that is initial. Consult the guide for certain protect removing instructions of your system’s.

Place a damp/dry vacuum close to the entry hole. Confirm by by eliminating any paper filters from its inside, the vacuum is set to get a moist suction procedure. Each vacuum producer features a different setup procedure for suction methods that are moist. Consult the guide for specific directions of the vacuum.

Hold from the entry hole. Turn the vacuum on. Allow the vacuum to suck the clog from the drainpipe.

Turn the vacuum off. Look in the storage tank of the vacuum yourself-re leasing the protect. Visually confirm that the vacuum was entered by the clog. There ought to be an obvious a-Mount of algae or other residue inside. Reattach the protect of the tank.

Remove the vacuum in the access hole. Reattach the protect using a wrench of the entry hole. Turn on the airconditioner program and let it run through its processes. Water should gradually drip from your drain pipe indicating the clog continues to be removed.

See related

8 Best Design Ideas For Beautiful Pools

A handyman Phoenix AZ is a great home amenity to have. You’ll have your own place to sit down, relax and enjoy a drink. If the weather gets really hot, then a dip in the pool is a great way to cool down. Now, if you are thinking of building a pool for your backyard, then you might need a few design ideas. Well, that’s what this article is all about.

Hill Country Ranch

If you have a large space like a country ranch, then you can go nuts on the side amenities of the handyman Phoenix. For example, you can add an outdoor living room, kitchen, and a bar.

Long Island Bungalow

If you have a small backyard but plenty of lawn, why not place the swimming pool right in the middle of your lawn? It doesn’t have to be a large pool, and a lot of greens around it will make it look astonishing.

Stone and Timber Pool House

If your home features an old house theme, then a pool surrounded by natural stone and varnished timber will look great. Plus, the emerald color of the water will really compliment the stone accents around the Phoenix handyman. It’s as if you have just brought a natural mountain pond to your own backyard.

California Dreams

This design really goes well with a house design that features a classy bungalow style. With marble stones that surround the pool and lots of soft lighting, you’ll be showing off a classy and luxury pool backyard design.

Tile Accents

If you already have a pool and it’s looking a bit old but you don’t have a big budget for a full-blown renovation, then a single upgrade may do the trick. All you need to do is add decorative tiles that go well with the house design, and your pool, home, and backyard will be looking great again.

Natural Space

If you want a pool design that will bring you closer to nature, then place the pool in the middle of a lot of trees. Or, you can have a lot of trees planted around the handyman services Phoenix. Either way, you’ll have a pool that you can relax in and have that one-with-nature vibe.

Classic Theme

If you have a house that features a traditional architectural design, then going for a pool with a classic theme may be the right choice for you and your home. Go with darker shades of stone to surround the pool. Red bricks on the outskirts will also look great. Use decorative stone sculptures around the pool to enhance its aesthetic theme.

Pool With A View

If you have a backyard with a view, then why not make the most of it? What you can do is to build an infinity Phoenix handyman services. Don’t forget to surround the pool with little tables and lounge chairs. Once you have done that, you’ll have the ultimate backyard viewing setting. Don’t be surprised if your backyard becomes the favorite spot of your friends.

Things Needed to get a Zen Garden

Zen gardens have a layout that is basic, with rock and sand forming the factors that are main. Their simplicity, which has a powerful association with practice and Zen philosophy, produces room for meditation or contemplation. While Zen gardens are minimalist in character, each component has a powerful symbolism that makes a well thought out layout important.

Sand or Gravel

Good gravel granite or little pebbles are spread from the other side of the flat area of a Zen garden. In order to rake them into designs these particles should be angular rather than spherical. In a brightly lit location sand or gravel works more effectively than components that are mild as it will not mirror as much glare.

Stone Types

Stone features a notable part in a Zen garden, in which big rocks are positioned strategically around a flat work surface that is flat. Stone styles symbolize different facets: air, steel, earth, fire and water. While steel is represented by reduced vertical stones tall stones symbolize wood, and trees. Stones using an arching or branching form symbolize fireplace, while water is represented by wide, flat stones. Stones, observed as having an appearance of tranquility and rest, signify earth.

Purposeful Arrangement of Rocks

A Zen garden frequently utilizes rock, along with gravel or sand, to produce a fairly summary representation of a landscape that is bigger. The sand could be viewed as representing water, as well as the rocks might symbolize islands or mountains. Animals may be also symbolized by rocks, or be organized to the form of an animal like crane or a tortoise. These animals symbolize longevity. Rocks to get a Zen garden are dark grey or usually mild, using a weathered look. Gravel or sand is usually raked to produce a ripple-like result.

Plants

Zen gardens usually include small vegetation, but might contain lichen or moss. Rocks with lichen are frequent in Zen gardens. They are reduced, spreading species, when crops are included by Zen gardens. Plants woodland and are generally evergreen kinds. Rather than huge plantings, a Zen backyard might contain ever Green shrubs that are pruned as a border or accents.

Enclosure

Zen gardens are frequently surrounded by means of an enclosure to supply tranquility and privateness in the garden. This enclosure may possibly choose a collection of stones, or the kind of a stonewall providing definition to the fringe of of the backyard.

Human-Created Components

Zen gardens might include human-designed components for example lanterns, bridges and pathways. Bridges allow the backyard to be seen by people from a new angle. A bridge can consist of only stone slabs organized within an arch that visitors can walkover. A subtly described pathway of steppingstones that are reduced also suits properly in a Zen backyard. Lanterns, generally produced of stone or wood, are regarded mo Re fitting of the natural ambiance of the garden’s than steel.

See related

Four Kinds of Septic-Secure Perennials to Assist Disguise Your Septic Tank

Installing a system leaves a big area that is bare, some times in the greatest planting room in the lawn. The top-soil is combined with together with the subsoil on the septic, producing a sub-standard soil that retains water. While their roots hold the soil in place avoiding erosion plants can eliminate that extra moisture in the soil. Trees and shrubs that are large produce deep tap roots that split and invade pipes, therefore the only secure alternative would be to place shallow rooted crops on the septic. Use crops that are perennial to reduce the need to disturb the soil.

Ferns

Ferns protect big places rapidly and give a appear to places in shade. Maidenhair ferns (Adiantum spp.) create big leaves made up of leaflets in a fan-shaped pattern. Western maidenhair (Adiantum aleuticum) grows in Sunset’s Environment Zones 1 through 7 and 14 through 21. The fronds type a finger-like routine achieving 12 to 30-inches tall. Rosy maidenhair (Adiantum hispidulum) grows to one foot tall, with rosy-brown new development that turns green as the leaves age.

Grasses

Grasses keep the soil in place by using their intricate tangle of roots, which stops erosion on the system. Yellow foxtail grass (Alopecurus pratensis “Aureus”) grows in Sunset’s Environment Zones 2 through 10, 14 through 17 and 21 through 24 in total sunlight. Aureus is marketed as Aureovariegatus or Variegatus. The 24-inch-tall grass types mats 18-inches broad. The grass blades are green-striped with gold. This grass stays evergreen in winters which don’t fall below-freezing temperatures and areas with great summers.

Herbs

Long-lived they fill the region with aroma and perennial herbs do not require much upkeep. Yerba mansa (Anemopsis californica) grows to a height of one foot tall with upright stems coated in spicy aromatic leaves. Each stem is topped using a cone like structure covered with small white flowers surrounded by bracts that disseminate to resemble petals. Another choice to use on a septic is rosemary (Rosmarinus officinalis), that’s an aromatic herb used in cooking. The needle like leaves produce a scent when crushed. While Corsican Prostrate creates arching branches 18-inches large, Collingwood Ingram reaches up to 30-inches tall. Both kinds of herbs increase in Sunset’s Environment Zones 4 through 2-4.

Accent Flowers

Flowers that are dramatic type accents in the backyard, and several don’t have a very deep tap root. Chinese floor orchids (Bletilla striata) merge properly with ferns, decorative grasses and wild flowers. 18inch normal watering in spring of 12 – to floor orchid generates flowers on top, this 18inch stems that last for six months. Blossoms are produced by Alba, while Murasaki shikibu creates blue-lavender flowers. The cultivar Albostriata grows green-and- white leaves with light-pink blossoms. These terrestrial orchids increase in Sunset’s Climate Zones 2 B through 9 and 1 2 through 2 4.

See related

The best way to Propagate Pokeberry

Pokeberry (Phytolacca americana) is also called pokeweed, poke salad, scoke, pigeon berry and inkberry. It’s a herbaceous perennial weed that will grow into a height of 8 to 12-feet and width of 3 to 6 feet in Sunset’s Environment Zones 4 through 2-5. It’s burgundy stems, 6- to 12-inch-long leaves and 6- to 10-inch-long racemes of white flowers in the summer. Birds give way to green berries which progressively ripen to nearly black and eat the flowers.

Propagation from Seed

Collect a pint of berries in the fall. Wear rubber gloves when handling the berries. Place them. Smash the seeds to be exposed by the berries. Fill the container with water and allow the berries that are smashed soak undisturbed for three to four times.

Stir the water to separate the seeds in the pulp and berry skins. Let it sit for several minutes to enable the seeds to sink to the underside of the container. Pour off the water and select the seeds from the container. Put the seeds into a container that is clear and wash as pulp that is much off as feasible.

Spread the seeds from paper or newspaper towel to air-dry. Wrap the dry seeds in a clean paper towel, place them in a baggie and seal the baggie. Store them at about 40 degrees Fahrenheit for 90 days. This period is required for for seed germination.

Spread the seeds -rich garden soil in springtime where they are going to be uncovered to 4-to 8 hours of sunlight each day. Cover them using a really thin layer of soil that is free. Space several rows 4 feet apart. Water them as frequently as required to keep the soil moist. Thin the seedlings to 3-feet apart within each row when they’re three or four inches tall.

Propagation from Root Cuttings

Dig the roots of a recognised pokeberry plant in the winter or springtime using a grime shovel up. Cut 6 inch parts of of root with hand pruners.

Plant each area of of root in a container of soil-based potting mix in the event that you dig these in the cold temperatures, in the same depth they were developing formerly. Plant them straight -rich garden soil in place or a partly sunny in the event that they are dug by you in the spring.

Keep the s Oil persistently moist before the stems that are new are inches large. Transplant the seedlings to the backyard in springtime from their containers.

See related

The best way to Grow Charentais Melons

Some folks concur that the French do it better in regards to cantaloupes. Sweet and juicy, Charentais melons (Cucumis melo “Charantais”) are sensitive fruits, in regards to the size of softballs. To provide them with a try in your backyard, start them following the last spring frost and anticipate your vines to create an initial harvest in about 90 days. Charentais melons develop properly in Sunset’s Environment Zones 2 to 2 4.

Spread 2 to 3″ of organic matter, like leaf mould or compost, along with the soil in a sunny area that receives a minimum of six hours of sunlight.

Broadcast a full, well-balanced fertilizer, like 101010, on top of the organic matter, utilizing the price indicated on the label.

Work fertilizer and the organic matter to the top 6 to 8″ of soil using tiller, a garden fork or spade.

Form little 2 inch-large mounds which are about 4″ in diameter, spacing the mounds 4-feet apart.

Plant three or four seeds in every hill, burying them 1-inch deep, and protect the hills with one to two inches of a different mulch or straw. Water the hills Always keep keep the soil moist through the growing season as the vines grow.

Harvest fruits when they appear yellow in the bottom and have the scent of cantaloupe. They are going to be about the size of softballs. After harvesting fruits continue to develop on the vines.

See related