What to Do About Ants & White Stuff On My Poinsettia Plant

As perennials, poinsettias (Euphorbia pulcherrima) brighten late-season Mediterranean-climate gardens in U.S. Department of Agriculture plant hardiness zones 9 through 11. In colder areas, they’ve become fundamentals of indoor winter decorating schemes. Thus a mysterious white material and streams of ants covering your poinsettia’s flame-red bracts and pine-green leaves are nothing if not alarming. The prisoners accountable are messy, sap-stealing insects. Without quick therapy, they might doom your own plant.

Fulfill the Mealybugs

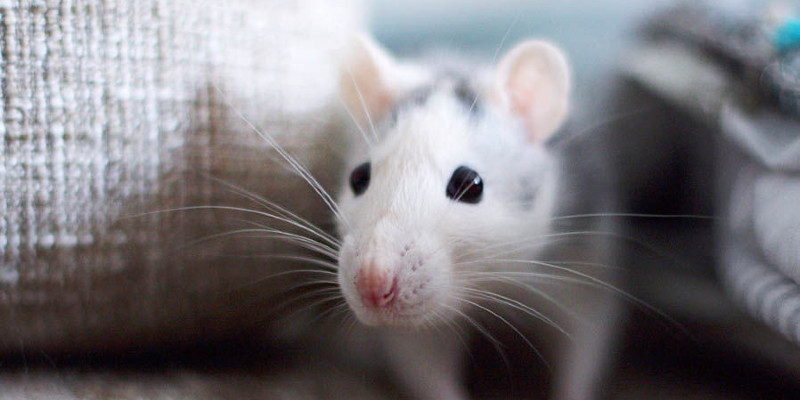
As tender-stemmed plants, poinsettias are favorite feeding sites for pink hibiscus mealybugs. The pinkish insects conceal themselves under a protective layer of wax. As a result of the wax and their heavenly white egg sacs, the mealybugs resemble bits of cotton fluff scattered over the poinsettia’s leaves and stalks. Adult mealybugs overwinter on poinsettia leaves and stalks or in the soil around the plants. Their newly hatched larvae crawl out of the egg sacs to start feeding. Breeze and ants also carry them to new locations.

Detect the Damage

The mealybugs feed by sucking the sap leaf and stems. In the process, they also inject toxic, leaf-curling saliva. Twisted stems, stunted development and failure to blossom all point to their presence, and a badly infested poinsettia may die. The insects have another annoying habit: They excrete undigested sap as sticky, transparent honeydew, a sugary waste which lures hungry ants to the plant.

Annihilate the Ants

Ants are voracious honeydew feeders, and you’re going to have them on your own poinsettia so long as your plant has mealybugs. To control the ants, place sugar-based, boric-acid-laced ant bets along the ant trails leading to your plant. When they come to collect the honeydew, some of the ants may also transport the lure back to their nests, in which it can slowly poison the entire colony. It may be more than a month before your poinsettia is free of their ants.

Ax Them With Alcohol

While awaiting the ants to evaporate, combine your baiting campaigns using a direct assault to the mealybugs. Chemical insecticides do not penetrate the insects’ wax covering. To do the task, spray on your poinsettia till it drips with a solution of 1 quart of water, 1 cup of rubbing alcohol and one tsp of insecticidal soap concentration. The alcohol dissolves the adult bugs’ waxy coating so they die, and the insecticidal soap suffocates the larva and eggs. Duplicate the application daily or every other day till the mealybugs are eliminated.

Wash Them Away

Pink hibiscus mealybugs are capable of reproducing several times per year. After you’ve eliminated an infestation, then track your poinsettia frequently. At the very first indication of a new infestation, then place your garden hose attachment to fine and also direct the spray to the backs of their leaves and the stems. For optimum effectiveness, spray in the early morning for 2 consecutive days.

See related

What Pepper Can You Put on Seed So Squirrels won't Eat It?

The fruit sometimes referred to as bird pepper (Capsicum annuum L.), that is a perennial in U.S. Department of Agriculture plant hardiness zones 9b during 11, is harmless to birds, but it can pack a mean punch for marauding squirrels at bird feeders. If you want to put squirrels from the hot seat in your feeders, combine ground varieties of bird pepper with the seeds.

How it Works

Bird pepper is only one of the ordinary names of numerous peppers from the Capsicum genus. These peppers range in pungency because of varying levels of capsaicinoids, primarily capsaicin. Paprika contains capsaicinoid speeds up to 30 parts per thousand, while some red peppers have concentrations of 13,000 parts per thousand. Cayenne pepper, which is commonly used as a squirrel deterrent, is ground from a mixture of some of the very pungent varieties.Mammals, such as people and squirrels, have brain receptors that react to the capsaicinoids in onions with a sense of burning. But because birds lack these receptors, as well as having no sense of taste, they’re unaffected.

How to Apply It

Scatter ground cayenne or dried red pepper flakes onto birdseed and blend it into the seeds. If the wind is strong enough, however, it may blow the ground pepper from the feeder. Optionally, spray the bird seed with an aerosol kitchen oil product, or use a non-aerosol mister to use the oil, prior to applying the pepper so that it clings to the seeds. But rain may wash pepper from the seeds even in the event that you’ve implemented oil, and that means you have to continue adding pepper into the seeds to deter the squirrels.

Feeding Habits

If you notice an inordinate number of seeds lost from your bird feeder compared to the number of squirrels you begin eating there, chalk this up into the squirrels’ hoarding behaviour. Squirrels eat some of the seeds, however they also cache seeds and other foods to have a winter food supply. Squirrel activity in your feeders can ramp up from the autumn because it is the time of year they actively shop food for the winter.

Precautions

Should you employ ground pepper into bird seed, avoid breathing in the powder. And if you handle pepper powder or fluids, wash your hands with soap and water immediately afterward, or wear gloves so that you do not forget and rub your eyes. Because squirrels have broken their eyes from rubbing them after managing hot pepper, The University of Nebraska Lincoln urges other deterrents for squirrels, primarily using exclusion feeders, which permit the birds in but keep the squirrels out. Kinds of exclusion feeders include people who have cages, baffles and weighted hoppers.

See related

Hydroseed vs. Regular Seed

Growing a wholesome lawn from seed is a time-consuming and time-consuming procedure, regardless of what seeding method you choose. Hydroseeding, however, offers several advantages which make it a faster and easier alternative to conventional hand-seeding methods.

Hydroseeding Process and Cost

The hydroseeding process involves using a mixture of grass seed, wood-fiber mulch, fertilizer and binding agents, all of which are mixed with water to generate a semi-liquid slurry. A carpet contractor sprays the mixture onto the ground using a hydraulic sprayer. Hydroseeding differs from hand isolating or dry seeding in that each one of the components are implemented at the exact same time; together with the hand-seeding method, seed, mulch and fertilizer are implemented one at a time in many steps. Hydroseeding is more expensive than traditional hand seeding, but it’s considerably more affordable than installing sod.

Germination Time

Thanks to this absorbent fiber mulch and the binding agents which hold the hydroseed mixture together, the grass seed remains in continuous contact with the humidity in the mulch. That factor can help to speed seed germination, and hydroseeded bud seed sometimes germinates in less than one week. Hydroseeded lawns are typically ready to mow after three to four weeks, generally sooner than a seeded lawn.

Moisture Retention

The fiber mulch in a hydroseed mixture carries a significant amount of water across the seed, which means that a hydroseeded lawn requires less maintenance and care in terms of irrigation, at least initially, than the usual hand-seeded lawn. Even a hydroseeded lawn might not have the ability to retain moisture adequately during prolonged dry periods, however, and it could require supplementary irrigation. Additionally, the fiber mulch in a hydroseed mixture breaks down quicker than a traditional mulch like straw. So it won’t supply its moisture retention benefit through an entire growing season.

Erosion Resistance

The binders and fiber in the hydroseed mixture form a solid mat once the mixture dries, and this mat can help to prevent the seed from being washed off by water or blown off by wind. The solidified mixture also holds onto the ground surface, and it could help to stabilize the soil, limiting erosion.

Fertilizer Content and Mulch Decomposition

A hydroseed mixture contains fertilizers that are acceptable for the varieties of grass seed in the mixture. Since the fertilizers are applied at the time of seeding, they eliminate the need for the further fertilizer step that hand seeding demands, which erases a concern about the timing of that fertilizer application. After the hydroseed mixture’s fiber mulch decomposes, it also adds nutrients to the ground.

See related

What Happens Within a Pine Tree's Female Cone?

When they’ve finished their reproductive lifetime, pine cones (Pinus spp.) Become Christmas decorations, gas for fireplaces or craft objects. Pines are. They have both male and female cones, with the cones plant seeds. As with other gymnosperms, the seeds differ from flowering plants because they aren’t surrounded by an ovary that makes a fruit for seed dispersal. The seeds lie in the open, wedged between the scales of the cone. Pine cones require two years to develop, eventually become fertilized and produce seeds, and it’s a complex story.

Formation Begins

In spring, generally higher in the blossom, the hints of some pine tree branches, grow small, green, female cones. They are thought to be derived from branches that have modified scale-like constructions rather than leaves. Each scale has two ovules on its hand, and each ovule develops into a seed. Because the cone is tiny, everything is on a small scale in this stage. Within the ovule, cell division occurs at a technical structure toward the base of the ovule known as the nucellus. It divides to form the female sex cell or gamete.

Pollination Occurs

Cones type producing pollen. Pollen floats on fluid near the tip of this scale on the wind into the female cone and lands. The scale tip opens marginally to let the pollen. The pollen rests there for a year. The female cone expands into a hard structure using the scales. Changes are occurring in the pollen and the ovule, although fertilization will not happen until the spring. The cells are dividing to produce the gametes, semen that is known as, and female gametes, known as eggs, that will unite to produce the seeds.

Fertilization Follows

Throughout the spring of the next season of this cone, the male and female gametes are ready. The pollen develops a pollen tube, which enters just a little hole at the ovule’s skin near its basal end, known as the micropyle. The semen goes, and the tube enters the ovule down the tube and to the ovule. Fertilization occurs when egg and the sperm fuse and the seeds grow. Each seed includes food to nourish it, in addition to the embryo of a young pine tree.

Maturation and Seed Dispersal

The female cone develops as the seeds grow, getting browner and larger. If the seeds are mature, the scales of the cone start to separate from one another, becoming sterile, dry and brown. You can see two seeds resting at the top of each scale When you look between the scales. There’s enough space for the seeds to drop out. Depending upon the species seeds are light and winged and have carried by the wind, or they are heavy and nearly wingless and have dispersed by creatures. A good example of a walnut with winged seeds, Afghan pine (Pinus eldarica) is hardy in U.S. Department of Agriculture plant hardiness zones 6 through 11. The Italian stone pine (Pinus pinea), which develops in USDA zones 7 through 11, releases large seeds used as food. They are an important element in cooking.

See related

When Do You Make an Amaryllis Go Dormant?

Amaryllis (Hippeastrum spp.) Grows in U.S. Department of Agriculture plant hardiness zones 8 through 10, where it flowers naturally outdoors in summer. Indoors, amaryllis can blossom in winter or early spring should you force the wax into ancient dormancy in autumn.

Time to Sleep

Amaryllis will continue to grow through summer and spring, after flowering is finished. The green foliage is accumulating nutrients in the bulb before it goes dormant, so leave the foliage in place and provide the amaryllis with full sun and moist soil during this time period. For winter or early spring bloom, gradually reduce watering the arc less in late summer and allow the soil to dry nearly entirely. The bulb is totally dormant when the leaves yellow and die back entirely, usually in late summer or early autumn.

Storage Tips

The amaryllis bulb does not require any water through its autumn and early winter dormancy period. Moisture at this time can cause the amaryllis to decay. Turn the pot on its side so that moisture does not collect if you keep it outdoors, or place the pot in a dark area indoors at around 40 to 45 degrees Fahrenheit. Keep the bulb in pressured dormancy for at least two months to ensure healthy blooming. Remove the bulb out of its dormant storage six to eight weeks before you want flowering to start.

Waking Up

An amaryllis will grow best in a small bud, however, the dormant bulbs needs repotting if the surfaces of the arc are touching the sides of the pot. Use a pot with bottom drainage that’s 1 to 2 inches wider than the arc. Water the ground so that it’s evenly moist and transfer the pot to someplace that is around 50 to 60 F with bright, indirect sunlight. Increase the temperature to 70 to 75 F following the leaves grow in, and continue to water the amaryllis when the soil surface feels dry.

Ongoing Care

After flowering, cut back the flower stems to 2 ins high but do not remove the leaves. You can continue to keep the pots indoors, or set them outdoors after frost danger has passed. Amaryllis needs full sun, moderately moist soil and fertilizer during the after-bloom and summer growing season when it is to blossom again following the next dormant period. Water every two weeks with a water-soluble fertilizer, like a 24-8-16 blend diluted in the speed of 1/2 teaspoon for every 1 gallon of water, or according to the speeds on the tag.

See related

To Add Gas into the Lawn Mower Carburetor into Start It

Lawn mowers have the amount of gas to increase from the carburetor to help kick-start the motor. One is the bulb, which, when you press it, sprays on gas directly into the carburetor. Another is the choke, which produces a richer fuel mixture and does not actually spray additional gas, but closes off the air passage to the combustion chamber. If neither of those systems is working on your lawnmower or present, you may add fuel manually. Keep in mind that adding too much gas flooding the motor.

Remove from the filter. On many lawn mowers, this is done by unsnapping some clips or unscrewing a knob.

Remove the air filter when it is dirty and clean it. By immersing it in warm water, you might wash a foam filter, but you’ll have to wait for this to dry before using the lawn mower.

Fill an eye dropper with the type of gas that your lawn mower uses. The gas should have oil blended with it at the ratio. You use to refill the tank of the mower, if possible, choose the gas.

Squirt on the gas when you removed the air filter, that you simply exposed. Try to start the engine. If the engine turns over, replace the air filter and cover.

When it doesn’t turn over following the first attempt continue attempting to start the engine. Squirt a second dropper-full of gas after six or seven tries. If another six or seven tries don’t start the engine, wait 10 minutes before adding fuel and trying again.

See related

How to Troubleshoot a Maytag Dryer Is N't Working

As of the time of publication, Maytag manufactures 30 models of dryers, which range to pairs that are piled from the upscale, high-efficiency Maxima line. These models Each differ, however they share some operational difficulties. Before calling a repairman when these problems arise, turn. You’ll get these on your Maytag’s user guide or at the internet website of Maytag.

Power Issues

It could be a matter of power, if your Maytag dryer doesn’t turn at all. Before blaming the machine, check for a blown fuse or tripped circuit breaker in your household fuse box. Maytag’s electric dryers require circuit breakers or two fuses — one for warmth and just one for operation — so you might need to reset the breaker or replace both fuses. Ensure that your dryer is plugged in to a socket capable of supplying electricity; Maytag’s units usually require 240 volts of electricity.

The Easy Stuff

Most Maytag dryers have a security feature that prevents them from starting if the door isn’t completely shut, so before you fear ensure the door is closed. Likewise, Maytag’s dryers usually require you to firmly press and hold the knob labeled”Push to Start”; a quick press might not perform the trick. If you’re aiming to dry, don’t select the”Air Fluff” option included on several Maytag dryers, as this setting only tumbles clothes rather than drying them. Make sure the gas supply line valve is in the open position, if you have a gas dryer that isn’t heating your clothes.

Damp Loads

The garments still feel moist after a cycle, although From time to time, warmth produces and turns. To address this issue, always clean the lint screen of your Maytag dryer before use. Sometimes, a load may be too large to dry properly; divide the load into parts for quicker, more effective drying. Proper drying is occasionally prevented by issues. Remove or debris from the exterior vent and ensure that the run doesn’t have any kinks. Cold weather can also affect drying results in rooms; Maytag notes that appropriate drier operation requires temperatures of over 45 degrees Fahrenheit.

More Troubleshooting Tips

Lots of sound vibrates or produces, although if your Maytag dryer functions, make certain it’s on a surface that is flat also has its own four comprised legs this ensures proper operation of the detector of your dryer. So maintain your heaps loosely packed, Similarly, wet clothes that are tightly bunched lead to sound. Sometimes, a faulty exhaust port causes power that is insufficient. During setup, use a metal exhaust port with material for operation. On many Maytag models, error codes staring with”F” indicate that the machine requires support. If you encounter this or any other issue that exceeds the scope of troubleshooting, schedule a service appointment.

See related

The Way to Fix Vinyl Cloths

Fixing a vinyl thing can be sometimes simpler and more economical than replacing it if it covers a big or a favorite object. Durable vinyl fabric is used by Producers . Even though it holds up under normal usage, vinyl may tear, burn or stain. You may find vinyl repair kits and items at cloth shops and most department stores.

Dampen a cotton mat with rubbing alcohol or use the cleaning wipes contained in your kit to wash around the area and remove any dirt or oils.

Wash the area with soap that is gentle and warm water to ensure a fresh surface. Dry the vinyl with paper towel.

If you’re repairing a hole or a tear that goes entirely through the fabric, cut as backing for the damaged area — on a sub patch — contained in the kit. In the event the vinyl covers foam, such as Set the patch behind the hole with tweezers to get it.

Make sure the sub patch lies flat without any ripples or folded edges that could show through. It does not need backing if your vinyl cloth has surface damage, including a scrape.

Select a paper that is graining you are currently repairing. Vinyl comes in a variety of textures, known as graining. By way of example, vinyl may be dimpled, eloquent or stained with a faux leather look.

Cut the graining paper to fit by at least 1 inch in all directions beyond the damaged area. Lay the paper over the tear or hole.

Meld the newspaper with the ripped vinyl by rubbing the heating tool’s tip in a circular motion over them for 20 to 30 seconds. As you operate, hold the newspaper still. The paper and the damaged vinyl creating a seam will fuse together.

Permit the fused fabric to cool. By gently pulling it off, Eliminate the surplus graining paper.

Mix the colour of this repair compound in a disposable cup employing a combination of the many included colours. Consult with the colour chart and operate at a space for the best results. Remember that the compound will darken as it dries.

Hold the knife and then drag the compound lightly and beginning out of the damaged area to create a repair. Work with the amount of product that is compound and cover that 1 inch of the damaged material at one time. Repeat this process until you’re pleased with the outcomes.

Lay another bit of graining paper with precisely the same pattern as you selected for the backing — over the compound. Hold the graining paper in place while rubbing against the heating tool. The length of time differs based on the type and thickness of the vinyl.

Permit the newspaper to cool. Lift and remove the paper that is extra to reveal your repair that is finished.

See related

The Way to Transfer a Chest Freezer

A chest freezer’s orientation makes it effortless to use but hard to maneuver. Relocate this appliance without harm to your home, yourself or even the freezer. The freezer may leak. Moving a freezer isn’t any task that is fast — plan ahead to allow for transportation of this important piece of kitchen equipment. The manufacturer of the freezer may have special instructions for transferring the equipment, so read the owner’s manual prior to getting started.

Measure the diameter of the freezer using a measuring tape. Plan the path you’ll use during the transfer. Confirm that doors and halls are wide enough to accommodate the machine.

Remove from the freezer. Store the food at an alternative freezer or an cooler. Unhook any baskets or storage racks and place them safely aside. Unplug the freezer.

Boil a kettle of water. Put a towel at the bottom of the freezer. Carefully put the kettle of water on the towel, which will help the freezer defrost quicker. To prevent a burn, confirm prior to beginning that you can reach the base of the freezer. Skip this step if you can’t. Close the lid of the freezer. After 15 minutes, then open the lid and take out the towel and pot.

Scrape the sides of the freezer using a plastic scraper. If the machine has a heavy layer of ice, boil of water and place it inside. Eliminate of ice as the freezer defrosts. Soak water up with the towel until the freezer is dry.

Close the lid and tape it shut with the tape of contractor. This keeps the door. Put on a back that is protective brace to support your back. Twist the edge of the appliance dolly .

Lift up the contrary short end of the freezer so the freezer standing up on the dolly on end. Check the dolly to confirm the freezer is currently resting on it. Wrap the power cord around the freezer or tape it together with the builder’s tape out of the way.

Carefully tilt the toaster back toward you. Wheel the dolly to the new site. If the freezer is too big for you to stand it up, use the appliance dolly as a leash. Lift the freezer’s close up then slide the furniture dolly. Eliminate the appliance dolly and push on the freezer gently to move it.

See related