The best way to Get a Concrete Flooring Prepared for Linoleum

Linoleum on a concrete ground needs more sweeping up a small grime and that eliminating your old flooring. The area should be free and clear of any items that may affect the glues. Cracks that may allow moisture to seep through the concrete should be repaired, as well as the floor has to be leveled. Failing to get a ground prepared for linoleum correctly could result cracking or lifting of the linoleum over time.

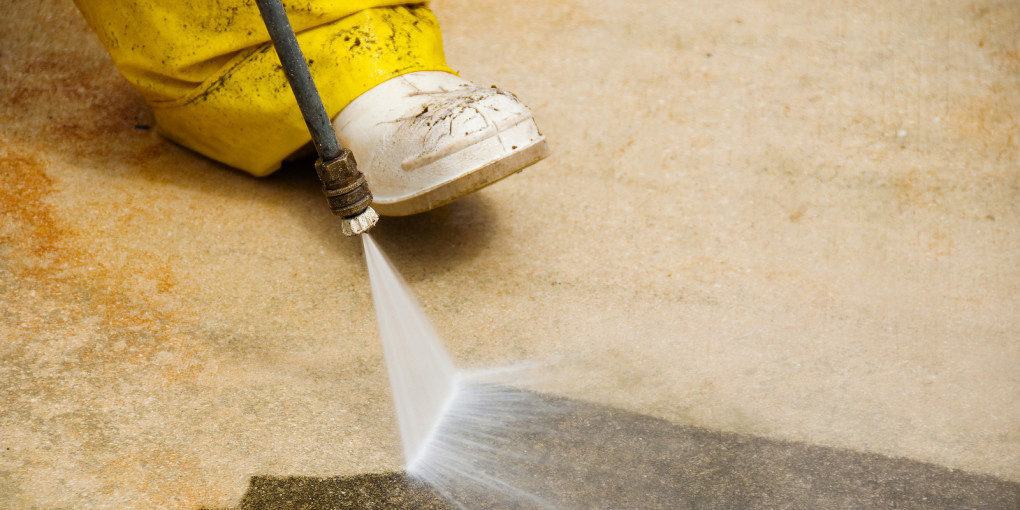
Sweep the concrete to eliminate particles and big grime from the ground. Vacuum the ground to eliminate and particles sweeping using a broom may skip.

Don safety goggles to guard your eyes. Wear long pants, a long-sleeved shirt and gloves.

Mix 1/2-cup of tri-sodium phosphate with 2 gallons of water that is hot in a 5-gallon bucket. It’s possible for you to find TSP at home improvement facilities and hardware stores. Working in small places, scrub the floor using the TSP as well as a mop to clear grime, oil, paint and any grease from the ground.

Rinse the area with clear water. Wipe up the excess water before shifting to the area that is next. Allow the floor to dry completely. Drying times will differ depending on humidity and the climate.

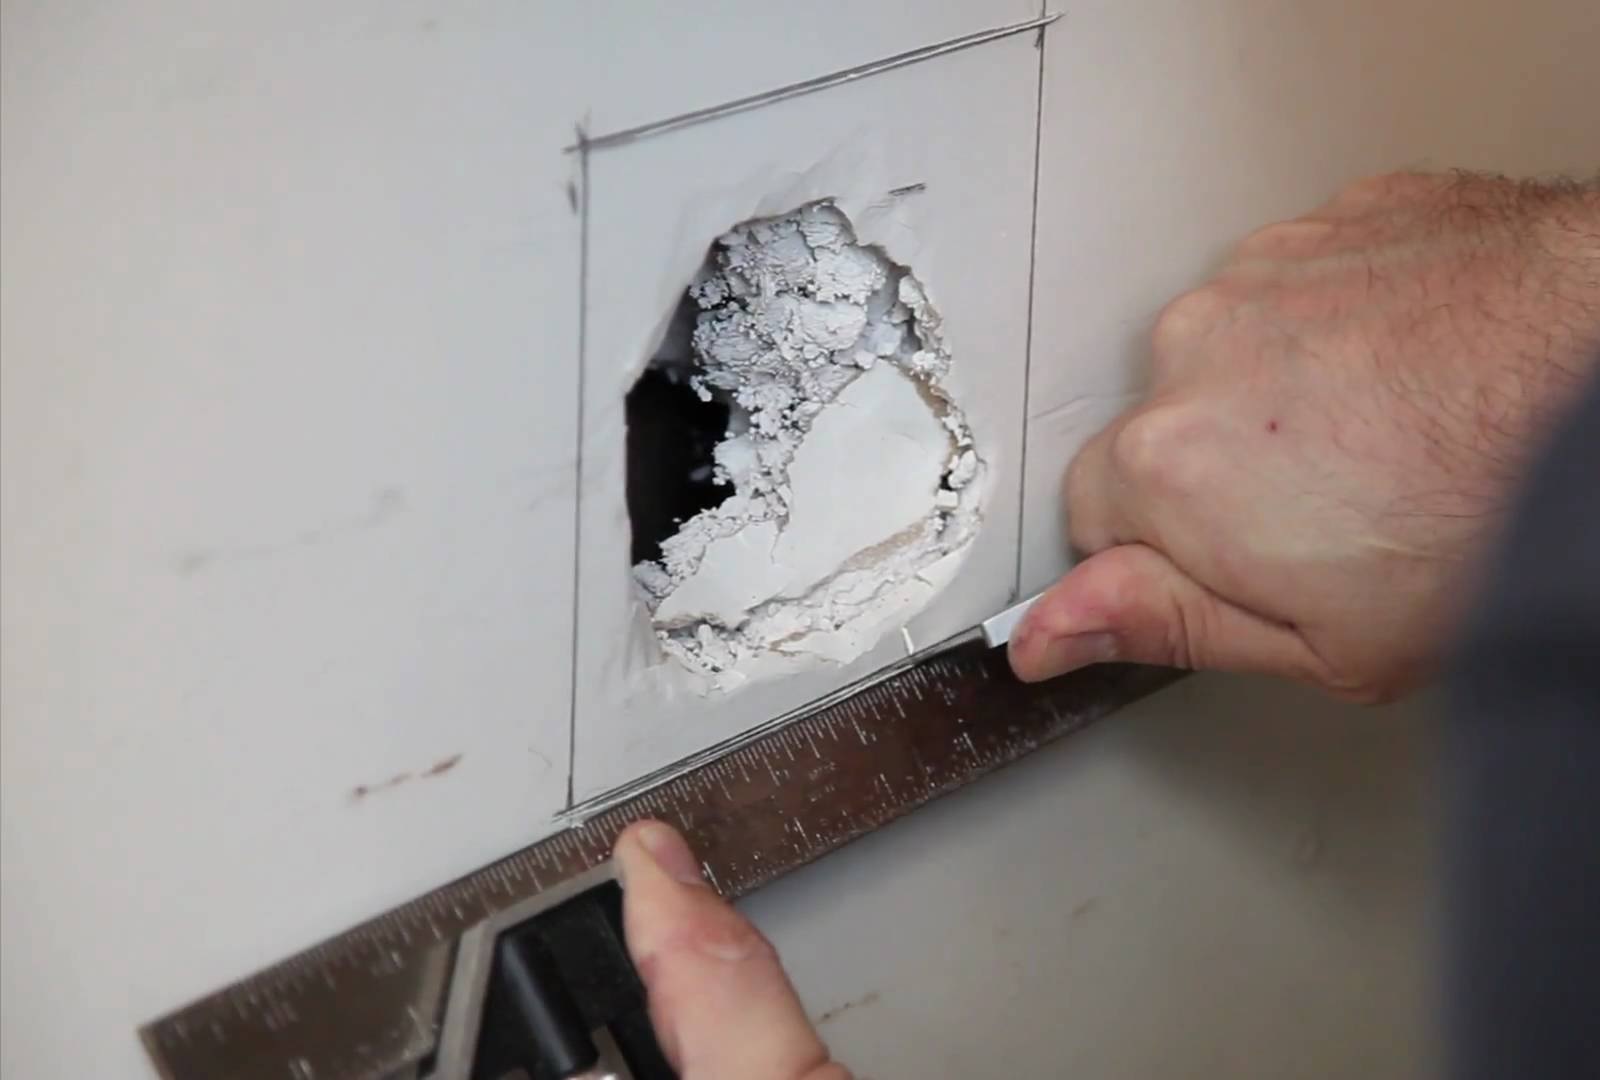
A ground patch that was pre-mixed created for use to fill holes and any cracks in the flooring. Use the straight-edge of a trowel or a putty knife to smooth the the top of region that is patched, feathering the edges to mix the patch to the concrete. Refer to the manufacturer’s instructions for just about any special program factors and drying times.

Pour water into a 5-gallon bucket and include ground leveling compound with water to the consistency of a milk shake. Check the instructions on the leveling compound for the correct water to powder parts for the greatest outcomes.

Fill any depressions in the flooring with all the leveling compound. Feather the compound utilizing a trowel or putty knife along the edges of the depressions to mix the item with all the around floor. Drying times will differ based on the merchandise manufacturer’s suggestions along with the climate problems.

Wrap ablock of wood in a sheet of program-grit sand-paper. Place a dusk mask over nose and your mouth. Sand the complete area of your flooring. This assures the glues you use to your linoleum will bond together with the concrete. Vacuum any dirt from the ground.

Cut 6-mil plastic sheeting in to several 2 foot-by-2 foot items. Place the plastic on various parts of the ground. Tape the plastic to the flooring with duct-tape, sealing all sides.

Let the plastic sit undisturbed for 2-4 to 4-8 hours. In the event the concrete seems darker under the the plastic or condensation seems on the lower of the plastic, you ought to contact before installing the linoleum ground, a contractor who specializes in moisture problems.

Check the humidity le Vel of the room. Don’t install the linoleum before the humidity le Vel reads between 6% and 4-0%. After the appropriate humidity le Vel is reached by the space, continue with installing your linoleum ground.

See related

Learning How to Weld

It’s possible to start learning welding using simple tips and tricks. Although there are a lot of skills that go into this, it doesn’t take a lot of time for you to learn and get better gradually.

We have a few simple tips for you that will help you become an experienced house repairs.

Getting Ready

Before you decide to start, it’s important to try out a few things. First, hold the gun so you can practice. One hand needs to be at the base of the gun to provide the stability needed for accurate works while the other hand will be on the trigger. Try to move the gun steadily over a metal surface as if you are actually welding. Once the gun feels natural on the hands, pull it close to a weld surface, press the trigger, and touch the surface lightly for your very first welding test. You will always need to test the gun every time you are starting any job.

Prepare the Metal

Because welding involves working with metal, if you are going to become a reliable handyman services then you cannot afford to ignore metal preparation and handling techniques. You need to get all the right tools first. A carbide scribe or a woodworker’s awl is needed to make marks on the metal surface. You will also need a metal cutting chop. As a pro tip to use, when you cut the metal, slightly bevel the edges. This will make them stronger once welding is done. You will also need a clamp to position the cut metal pieces before welding. Once everything is in position, go ahead and begin tacking. Since this will be your first time doing welding, sometimes the metals in position may shift or disassemble when you are tacking. Just reposition them and keep trying until you get it right.

Finish Weld

As soon as you have finished with the tacking process, you need to now smooth out the edges and all the areas you have worked on. Grinding the edges is one of the most enjoyable steps in welding. However, you need to be careful not to overdo it. Grinding off too much might actually affect the structural strength of the item you have just created. Once the edges are smoothed out, you are done.

Painting

You can decide to paint the metal or leave it like that. It all depends on what you are creating. However, metal is a multipurpose material and there are many paints that can go with it. A coating of clear acrylic is however highly recommended by many welders. You can use a spray bottle to apply it smoothly on the metal surface.

Welding is simple if you are ready to learn about it. The simple tips above should help you get the basics right. In the end, with regular practice you will soon be among the good handyman capable of handling different kinds of tasks.

The best way to Glue Laminate Flooring Trim

Finishing a ground career with trim that is sloppy function ruins the layout movement of your house. It wants a great glue software as your floor trim functions as a buffer between the baseboards as well as the flooring. Laminate flooring shrinks somewhat according to the temperature and air moisture and swells. Allow for normal by leaving a 16-inch of room between the woodwork as well as the trim.

Allow any laminate items that are new to acclimate to your own home. Open the box and allow the breath for 48 hours.

Where you plan to to put the trim brush particles in the floor location. Remove any glue that is old using a putty knife.

Place the trim in to place to confirm it’s dimensions and the correct cut. Apply just one bead or line of glue from end of the piece to other, stopping short of the finish about 1/2 inch. Stopping quick stops the glue from seeping to another side.

Press the piece easily. Avoid getting glue on the laminate that is around or baseboard. Beginning in the center push on the trim somewhat and working outward. This eliminates any air bubbles in the glue.

Let the glue dry for putting furniture onto it or 1-2 hrs or even more before walking onto it.

See related

Greenhouse Cucumber Varieties

Greenhouses offer an ideal atmosphere for cucumbers that are creating, as they’re sun-loving veggies that need a constant temperature. Types that are greenhouse are gynoecious, with crops producing blooms that are female. This removes the need for bee pollination and advances the the crop. Before purchasing the cultivar that is best, consider the normal diseases that infect cucumbers in the location, the dimensions and colour of the fresh fruit, the complete crop produce as well as the space that’s available for developing.

Salad Types

The three primary kinds of greenhouse salad cucumbers will be Japan cucumber the slicer as well as the greenhouse cucumber. These have sensitive skin that doesn’t need peeling and are burpless. Fruits are 12 to 14-inches long and weigh about one pound. In in the USA, the European hybrids are frequently developed of these three. This contains Toska 7-0, the Sandra, Corona Farbio, Vetomil, Silvia, Bella and Fidelio.

Pickling Types

Fast-developing and spiny, beit-alpha or “mini” cucumber types may be eaten fresh or used for pickles. Popular types contain the Diamant, which creates a plentiful crop of fruit that is sweet which is excellent for fresh pickling and eating. The Manar selection needs to be grown through the highlight months, while the Jawell F-1 hybrid could be developed with less hours of sunlight. The County-Fair pickling cucumber is particularly popular with hobby greenhouse growers using its appealing medium- green fresh fruit which is seedless.

Disease-Resistant Varieties

Disease resistance is essential to consider when choosing a greenhouse cucumber range. Diseases like powdery and downy mildew are difficult to to manage as soon as they’ve developed. The County Reasonable pickling selection provides great resistance. Diamant crops are resistant to the mosaic virus, downy mildew, powdery mildew and scab. The Sandra, Corona and Farbio types comb At gummosis Toska 7-0, leaf place and downy mildew. The Bella, Silvia, Vetomil and Fidelio crops have exemplary resistance to powdery mildew. The Diva cucumber is a greenhouse favored due to the tolerance of angular leaf place, powdery mildew, downy mildew and scab. The Diva foliage is less bitter than other kinds, producing it less popular with cucumber beetles.

Bush Types

If room is restricted in the greenhouse invest in a cucumber cultivar. These crops create vines that are compact without compromising the vegetable yield. Varieties contain a slicer that creates dark-green, the Burpless Bush, seedless good fresh fruit. The The Tiny Leaf range is an area- preserving cucumber with spines and darkgreen epidermis. Orient Express crops are semi-compact and generate big, highquality good fresh fruit which can be consumed refreshing or pickled. The Pepinova range creates high yields and is just another good choice for small-scale greenhouses.

See related

Tips to Make Your Deck More Private

The main reason why many homeowners build decks is to extend their living space. Outdoor living is an essential part of your home and doing whatever it takes to make sure you are as comfortable as possible in the outdoors is very important. In case you are thinking of building a deck or perhaps you already have one, privacy has to be a number one priority. After all, the deck should be a little hideaway for you. It’s a place to relax and unwind after a long day and the last thing you need is the prying eyes of your nosy neighbor watching your every move.

Well, don’t worry! Here are a few tips that can help you enhance the privacy of your landscaping San Diego:

Plant Trees

You can plant trees to provide the cover you need. Trees are not just going to keep away the prying eyes but they can add to the beauty of the deck. The natural canopy of the tree will ensure that no one is able to spy on you from above. It will also provide great shade for the deck.

Build a Wall

If you don’t have time to wait for a tree to grow, you have a basic choice. Simply build a wall around your deck and you are done. The wall needs to be high enough to be effective. Building a privacy fence for the deck will not take too much time. It’s also very affordable.

Add the Sound of Water

Your landscape design San Diego should be a quiet place where outside disturbance is minimized. There is nothing more distracting as noise. The noise from the busy road outside your property can affect your deck’s experience. However, you can solve this by adding the soothing sound of water to drown off the outside noise. This will give you the ultimate decking experience.

Create a Canopy

Using natural green plants to create a canopy around your deck can also come handy in enhancing its privacy.  The neighbor’s second-floor windows will always be over and above your wall and they can clearly see what you are up to. You can solve this problem by creating a canopy over the deck and close off uncomfortable gazes.

Add a Roof

If you don’t have the time to create a canopy on your deck then you can simply roof it. This is perhaps the most effective solution to ensure that no one from above the wall can see all the way to your deck. But don’t just put up any roof. As much as privacy for your deck is the priority, it still needs to look good. You should pick a simple and classy roof.

The outdoor living space is very important for any home. But privacy issues might affect your experience on the San Diego landscaping. However, the simple tips above will go a long way on delivering the most effective privacy for your outdoor space.

The best way to Cover a Stipple Ceiling Up

A ceiling is designed to to include a visible texture to a location. A typical process to produce a ceiling would be to skim coat the area using a coat of drywall compound tap the conclusion of a dry -bristled paint brush to the area that is damp. The procedure to cover a ceiling up is a task that is challenging but it’s not as hard as it seems. One indicates to protect a ceiling would be to put an extremely thin layer of drywall compound, also identified as a skim coat, on the ceiling utilizing both a a dry wall knife or a roller.

Put on safety glasses.

Scrape the ceiling that is stippled using a 4 inch dry wall knife to eliminate peaks more than 4 4 mm tall. Skip this in the event the stippling is extremely gentle with peaks under 4 mm tall.

Look in the location and find cracks and bigger holes.

Open the dry wall compound. Premix dry wall compound comes in buckets. Place enough dry wall compound to the dry wall t-Ray to fill cracks and the bigger holes. Add sufficient water, if required, to produce a combination that is thick comparable to set pudding. The correct consistency of water and the dry wall compound permits the combination to to keep a peak when touched. Add small quantities of water. Mix water and the dry wall compound to test for the consistency of pudding, however capable to peak when touched. Repeat until the proper consistency is attained.

Fill cracks and bigger holes with dry wall compound. Load the front-edge of the 4inch dry wall knife with dry wall co mpound. So the dry wall co mpound is to the back-side, turn the dry wall knife. Place the fringe of of the dry wall knife on the ceiling at the finish of the crack or the top of the hole. Position the dry wall knife therefore it are at a 4 5-diploma angle. Pull the dry wall knife or crack to fill. So it’s as even while achievable using the ceiling area, level the dry wall co mpound together with the end-of the dry wall knife. Remove extra dry wall co mpound together with the end-of the dry wall knife.

Allow the filler to dry entirely before continuing. This can take from to four hours-depending on temperature and the humidity of the room.

Sand the dry wall co mpound positioned in cracks and the holes till it’s easy. Place a chunk of 400-grit sand-paper parallel together with the surface. Move the sand-paper in a round motion feather and to easy the edges to the around region. Feel the surface of the dry wall co mpound to make sure smoothness. Continue to sand if required. Note: Sand-Paper comes in numerous grits. The grit refers to the roughness of the sand-paper. The greater the amount, the nearer together the granules are around the sand-paper area. The nearer the granules are together, an area that is smoother is going to be created.

Wipe down the area using a moist fabric or sponge to eliminate dust. Allow the region to dry totally before continuing. The method will simply take 1 to 3-0 minutes-depending on temperature and the humidity of the room.

Place a generous sum of dry wall co mpound in a dry wall t-Ray. Add sufficient water to produce a creamy combination that is thick comparable to set pudding. The correct consistency of water and the dry wall compound permits the combination to to keep a peak when touched. Add small quantities of water. Mix water and the dry wall compound to test for the consistency of pudding, however capable to peak when touched. Repeat until the proper consistency is attained.

Slide the 1/4inch, brief nap, dampness-resistant plastic or phenolic core roller on the roller manage.

Place the roller in the dry wall combination and coat it.

Roll the mixture on the ceiling to generate a a skinny 1/16 to 1/8 inch of dry wall co mpound covering . Cover the whole ceiling. Allow 2 4 hrs to be dried by the drywall compound.

Sand the area of the ceiling utilizing a block with 400-grit sand-paper. Apply mo Re dry wall co mpound in are as where indentations from your stippling are nonetheless noticeable.

See related

Pressure Washing Tips and Techniques

Pressure washing is one of the more modern cleaning methods that people use today to deal with stubborn stains. It’s a technique that achieves results with very little effort. However, pressure washing is more than just taking a pressure washer and directing it to the surface you plan to clean. There are a few tips involved in this process that will guarantee a proper clean.

The following are some techniques you can use when doing Mountain View landscapes:

-It’s very important to presoak the surface with a normal household detergent or a degreasing agent. Some people may also use chemical based presoak. This will help reduce the washing time.
-Consider using hot water when pressure washing instead of cold water
-Pay attention to the surface you are washing. The pressure needs to be regulated based on the surface you are working on. For example, the pressure used when cleaning wood should not be the same as the pressure -when cleaning concrete floor.
-If you have used a detergent, rinse it off as soon as possible. You don’t want it to dry on the surface.
-There are some laws that govern pressure washing in various states. Most of these laws are designed to enhance environmental sustainability. Read and understand them before you start to clean.

Understanding PSI (Pounds per Square Inch)

The water pressure that comes from the cleaner is measured in PSIs. This is simply pounds per square inch. This is basically the measure of the total amount of force that’s delivered on the surface being cleaned. The pressure is very important because it breaks down the debris and makes it easier to clean. PSI will increase or decrease based on the size of the nozzle.

A standard can deliver pressure measuring 4000 PSI. In order to reduce the amount of force hitting a surface during cleaning, increase the distance between the muzzle and the surface. But professional cleaning companies use a more technical approach to determining water pressure during Mountain View landscape jobs.

The amount of pressure used will depend on the surface. For example, concrete floors will take up to 3000 PSI in pressure. Anything above that may end up damaging the surface. A car will need 2000 PSI while decks and other wooden surfaces may require somewhere between 2000 PSI and 3000 PSI.

Professional Pressure Washing

In case you don’t have the time to clean up your home through a pressure washer there are many companies that can help you with this. Large cleaning jobs that may require special expertise will need the input of professional cleaners. There are stains and other types of waste that need proper disposal.

Mountain View landscaping is a great way of getting rid of debris and other dirt on any surface. All you need is a pressure washer, some detergent, and a few simple techniques to get the job done. The tips above will definitely help.

The best way to Grow Apples on Trellis Systems

Together with the effective advancement of dwarf apple tree types, developing fresh fruit on a method has become more more desirable, for the homeowner as well as both commercially. Trellising is a means to to manage the progress of the trees, improve the fresh fruit-bearing region of the tree and make an intriguing function in the home orchard. These delicious apples on the very top of the tree are beyond achieve, as trellises are around 8-feet tall.

Install the trellis. Dig two holes 20-feet and 2-feet deep — about 2″ bigger in diameter as opposed to post apart. Put the posts to the holes and make certain they’re straight. Mix the fast-setting concrete mix in a big container and add water in accordance with the directions of the manufacturer’s. Pour the concrete to the holes. The concrete needs to be established in 20 to 40 minutes. Before continuing, allow the set for best results.

String four wires three wires spaced between the posts or spaced. Drill holes and install eyebolts in the holes. Attach a turnbuckle involving the wires as well as the eye bolt in order that they could be tightened if required.

Plant the tree 4-feet in the end post of the trellis. Space extra trees 6 to 7-feet apart, maintaining the graft union aboveground. Secure the tree to the wire with plant ties that are versatile.

As they produce in the spring and summer, secure shoots. They need to be tied at 45-degree angles in the primary trunk of the tree. Tie branches that are new so the tip isn’t lower than its point-of attachment. Make certain there reaches least one principal branch developing from the principal trunk in each course. Any shoots that develop far from the aircraft of the trellis (poking outward) should be possibly bent toward the trellis and tied there or pruned off. Allow one shoot to increase directly. This can be the primary stem from.

Remove any good fresh fruit that develops the firstyear to enable the tree to set its vitality in to progress and not fruiting. Following the first developing period when the crops are dormant, eliminate the final ends of the primary shoot and of all branches.

Prune and train recently branches that are building in the starting of the time very much the same as the first-season. Remove any good fresh fruit that types. The target would be to fill the wires of the trellis up with fruiting wood as quickly as possible.

Prune a-way any a way any limbs which might be dying, dis-eased or have ceased manufacturing of good fresh fruit. Cut these branches every one of the long ago to the key trunk and train the branches that re-place the outdated.

Train the branch of the tree over the most effective trellis wire when it reaches that peak. Also, educate an added branch in every direction across the trellis. From this time on, tiny pruning needs to be needed beyond maintaining the development thinned-out enough to enable air-circulation and adequate mild also to preserve a-3- to 4 foot width of the tree row.

See related

How to Repair Drywall

The use of drywall as an option to finish the home has taken hold over the last few years. However, the wall is not untouchable. Sometimes it can get damaged and that’s why you need to learn a few repair tricks that will help you along the way. The damages caused on the wall will range. Sometimes you will get smaller cracks that can be fixed. In other cases, you may end up with large holes that will take more time and effort to fix. Either way, you still need to understand a few repair tips.

Well, below are some of the most important ones:

Surface Crack Repair

There is a seamless paper covering found on your siding contractor Orlando, FL. The covering rarely cracks. Most of the time, cracks appear on the seam where two walls meet. Fixing these cracks is quite simple. The easiest option is to fill the crack with a new compound. Once the compound is fully applied, give it time to dry. Smooth the area using sandpaper and you are done.

Nail Pop Repair

Nail pop is one of the most common problems you will have with the wall. It’s usually reported in newer homes. Nail pop is simply a situation where the nail or the nail head protrudes through the tape on the wall. The solution to this is also very simple. The first step is to scrape away the area where the nail is protruding using a knife. Scrape until the screw or the nail is visible. In the end, use a screwdriver or a hammer to drive the nail back into place.

Corner Bead Repair

The outer corners of vinyl siding Orlando, FL are normally reinforced with plastic or in some cases metal edgings. These reinforcements are called corner beads. Although this is rare, sometimes a sharp knock on the beads may cause it to bend, crack, or chip off. To fix this issue, you will need to assess the affected area and ensure it’s an isolated problem. This is because a knock on the beads may cause damages on other parts of the wall too. Once you are sure the issue is isolated, chip off the loose material around the area and fill the resultant hole with the new compound. Allow it to dry and use sandpaper to smoothen it.

Hole Repair

The approach you will use to fix a hole in the wall will depend on how big the hole actually is. If we are talking about a hole larger than six inches, you will need to use specific patch kits. The kits will be readily available at your local hardware store. If the hole is small, first of all, measure the size. Get a new piece of drywall and cut it out to the exact measurements of the hole that you want to fix. Place the cut-out piece on the hole and reinforce it with fiberglass tape and screws.

The idea of fixing your siding Orlando, FL can often be a challenging task but all you need is a few DIY tips and you are good to go. The simple tips above should come handy.

Tips and Tricks on How to Properly Cut Trees

When cutting trees, there are essential, working techniques that won’t just create a working environment that’s safe for you and your property but will also allow you to work more effectively. In this article, we are going to give you the strategies you can use whenever you decide to do your own tree removal.

Safety First

Although it goes without saying, there’s a need for us to emphasize its importance. You should always wear ear protection, gloves, a hard hat, eye protection, and steel-toe boots when working with a chainsaw. It’s better if you can get your hands on safety chaps. Even if tree trimming seems pretty straightforward, you should always put your safety above all else.

Take Your Time

It’s tempting to cut a couple of trees in one go. However, you must take your time because you need to examine every tree thoroughly before deciding to cut it. This is to ensure that you’re sure of the direction of its fall. Aim to limit your workload. Plan carefully and do not rush the process, so a tree will fall exactly where you want it to.

Don’t Force It

Unless you’re a seasoned logger, you should never force trees to fall in the direction they don’t want to go. When you’re dealing with an “uncooperative” tree, it’s safer if you allow it to drop to the direction it’s inclined to fall. Also, you need to remove the logs off. As for the treetops, move them by hand and place them strategically. If you’re unsure of where a tree is going to fall, stop your tracks and ask for an expert’s opinion.

Stay Sharp

Keep the blade of your chainsaw sharp. This will ensure that you endure the work longer. Getting tired often leads to mistakes. Mistakes when handling a chainsaw may lead to very grave injuries.

Measure the Felling Zone

Trees reach the ground farther than you’d expect them to. They are also much taller than what you might think of them. You can estimate the fall of a tree by using the expert’s ax handle trick. With this strategy, you need to hold the handle of an ax at arm’s length, and then close one eye.

Back away from the tree or move towards it until the topmost part of your ax is even to the topmost part of the treetop. The bottom part of the ax must also be even with the tree’s base. After doing the trick, make a mark to where you are exactly because that’s where the treetop will fall. Keep in mind that this is just an estimate; therefore, you need to allow extra room.

Don’t Work Alone

When it comes to tree services, it’s a good idea to work with a partner. If you have a phone, bring it along with you. If an unfortunate event occurs, it’s always a good idea to be prepared. If you’re just working in your backyard, let your partner check up on you every hour.