The Way to Paint Glazed Tiles

A fresh coat of paint can change the appearance of an whole space and bring ugly, outdated or stained tiles back to life. Using the proper paint, followed by a protective topcoat, prevents peeling or flaking, and there are several sorts of paint made especially for use on glossy surfaces. While paint might not be excellent for tiled regions that get direct water flow, like showers, it’s tough enough to stand up to other kinds of regular wear, like to a floor or countertop.

Wash the tiles and grout thoroughly with tri-sodium phosphate. All dirt, wax, grease or other build-up has to be eliminated before painting or it will prevent the paint from adhering.

Wait at least 48 hours to the grout to dry thoroughly.

Tape off any areas which you do not plan to paint with painter’s tape.

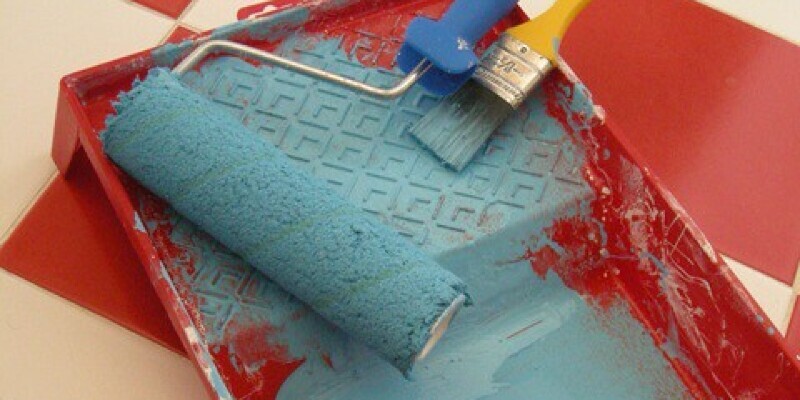
Roll a thin coat of primer on the floor, keeping all in 1 direction.

Await the primer to dry, typically approximately four to six hours.

Apply a thin coat of paint using a roller, keeping the strokes in a single direction and functioning gradually to avoid bubbles in the paint.

Wait at least four hours to get the first coat of paint to dry.

Apply a second coat of paint, which makes the strokes in 1 direction.

Allow the paint to cure for two days.

Wipe down the painted tile with a damp rag to remove any dust that might have collected while the paint was curing.

Dry the tiles with a soft, clean rag to remove any water stains.

Apply a coat of foam using a roller and functioning gradually to avoid bubbles.

Wait 24 hours to the polyurethane to heal prior to touching or using the tile.

See related

What Causes House Siding Paint into Peel?

Peeling and flaking paint on a home’s siding not only makes the house look unsightly, it exposes it to additional damage and expensive repairs. A well-done exterior paint project looks good and protects a house from the components. With the right preparation, products and technique, the paint job should last for ages. Finding out how to get the job done correctly the first time saves homeowners time and extra expense.

Surface Preparation

Painting a home’s siding successfully requires a decent amount of prep before the paint is used. Old paint needs to be completely eliminated, which is difficult on older homes which may be coated with several layers of weathered paint. The siding needs to be completely cleaned of all dirt, grime and mildew. A high-quality primer helps paint to stick better to the siding. Additionally, when it comes to wood siding, older, weathered wood does not hold paint well without a thorough sanding. Skipping the prep work ensures that the paint job will not hold up well over the long term.

Use the Ideal Product for Your Work

Most older homes were painted with oil-based paint. With the right surface prep, modern water-based latex paints can be used over oil-based paint, but oil-based paint cannot be utilized above latex; it will not adhere well to the surface. Siding made from hardboard may require a particular sort of primer. Aluminum and vinyl siding may not have to be primed in any way. Consult your siding or paint retailer to get information when it comes to your home.

Moisture Problems

If moisture has seeped between the house and its own siding, it can cause the paint to blister and peel off. Check gutters, leaders, the roofing and any other areas where moisture may have made its own way under the house’s siding. Making the necessary repairs can prevent other moisture-related problems and help to make the exterior paint project last longer.

Assess the Weather Report

Siding should not be painted in humid weather. After paint is applied, the moisture and solvents in the paint disappear, which allows the paint to form a tight bond to the surface. When the weather is wet or humid, the paint will cure before all of the water evaporates. Eventually it will begin to flake and peel off of the surface.

See related

How to Paint a Vintage Aluminum Tray

Your menu, such as most items made from aluminum, has a distinguishing all-natural silver colour. If any colour is current, it is usually because the alloy was anodized or abraded to provide it microscopic pores with colored dye injected into them. Aluminum is typically not painted because when it rusts — into a clear or black whitened patina — the rust appears almost invisible, and unless removed or chemically altered, it prevents proper adhesion of paint. If you wish to paint your aluminum prepare it correctly.

Planning

Use 280-grit medium-fine wet/dry sandpaper with water to sand each inch of this tray carefully to eliminate traces of oxidation and supply a slight tooth into the surface for paint adhesion.

Follow with 400-grit fine wet/dry sandpaper with water to eliminate the deeper scratches left from the first sanding, while retaining a slight tooth for mechanical adhesion of the paint.

Submerge the tray in a sink or tub of warm water to which you’ve inserted a couple drops of dishwashing liquid, then with a sponge or cloth to scrub the tray and eliminate any remaining grease, oils or wax. Scrub the tray in clean water and allow it to air dry.

Put on your rubber gloves. Scrub the tray, with a disposable rag or paper towelwith a 90-percent option of isopropyl alcohol or 1 part household-strength white vinegar to 3 parts water as the final rinse in eliminating previous oils and finishes.

Painting

Lay out several layers of newspaper outdoors on a windless dayaway from pets and kids. Place the tray on a block of wood.

Don all appropriate safety equipment, including safety goggles and the respirator.

Shake the can of epoxy primer vigorously to mix the paintthen spray a light coat on one side of the tray. Allow it to dry according to the manufacturer’s instructions before turning the tray over and coating the other side. Repeat with a second, and possibly third, light coat until you’ve got complete and uniform coverage. Allow the tray dry.

Sand the surface with extra-fine wet/dry sandpaper, 600 grit or finer, to smooth out irregularities. Follow with wet 0000 grade, or nicer, steel wool before the tray is smooth.

Scrub the tray with water to eliminate paint dust and allow it to air dry.

Spray a light coating of harmonious enamel metallic paint in your colour selection. Spray another coat to cover the tray. Allow it to dry for 24 hours to reach maximum hardness of the paint coating.

Coat the tray with a compatible transparent topcoat to finish.

See related

The Ideal Approach to Etch a Concrete Garage Floor

Whether you use your garage for storage, a workshop or simply to park your vehicle, employing an epoxy coating to the ground can alter the appearance of your garage while incorporating a layer of protection to the concrete. Before installing a concrete coat, but the surface must be properly prepared to be able to ensure adequate adhesion. Acid etching is the method that’s used to provide the suitable surface for coating applications.

Wear rubber boots, protective gloves and safety glasses when working with acid etching chemicals.

Wash start the pruning process. Etching solutions do not wash the concrete. They are used to abrade the surface. Sweep the floor to remove all dust and debris. Use a tiny stiff brush or paintbrush to get into the corners where dust can accumulate. Remove in the cement using a solution.

Add the etching solution to water in a container after the instructions of the manufacturer. With a watering can will permit you to pour the solution onto the ground in a uniform way. Use a container made in an acid-resistant material such as polyethylene.

Wet the entire floor using a garden hose with a sprayer. The surface ought to be moist but with no standing water.

Apply a small amount of the etching solution to a test area to determine whether you’ve got the proper strength. It ought to bubble vigorously. If not, add more acid.

Pour over areas of the ground at one time. Scrub the distance using a stiff-bristled broom at a back-and-forth direction. Then repeat by massaging the area going from side to side. Scrub as you move, and squeegee each region.

Scrub small areas at a time until you have etched the entire garage floor. The concrete should have a roughened appearance and feel like rough sandpaper, which will enable coating to adhere properly.

Rinse the floor using a garden hose. Continue rinsing until the water runs clear.

Permit the floor to dry for at least four hours prior to applying a coat to your garage flooring.

See related

How To Care for Outdoor Glass Top Furniture

While glass-topped furniture designed for outdoor usage is designed to withstand the elements, it’s neither indestructible nor resistant to dirt. Standard maintenance of glass furniture tops entails washing them with non-abrasive cleaners, such as a standard glass-cleaning spray.

Clear, Clean Glass

A glass surface such as a patio table outdoor end table typically attracts more dirt in a indoor glass surface. Rain, pollution and wind add dirt, dust and debris to outdoor furniture, which soon render that once-pristine glass surface to a table in dire need of cleaning. Wipe it first with a dry, soft cloth to pick up loose dirt, then spray along with your favorite glass cleaner, wiping with a soft fabric. Skip cleansers or unpleasant scrub pads which may scratch the glass. The underside of an outdoor glass tabletop also wants a thorough cleaning from time to time, although potentially less often. If stashing the furniture off during the winter, then cover the furniture with a canvas dropcloth or old blanket to stop both dirt and damage.

See related

How to Get Very Sticky Shelf Paper Away Cabinets

Shelf paper provides a protective and decorative element for cabinet shelves. Its adhesive backing was made to stick so well that there’s no uncertainty of it dropping its stickiness over time, or of corners curling and peeling up prematurely. Due to this, the shelf newspaper could be somewhat difficult to remove when it comes time to redecorate or revamp these cabinets. Warmth, in the kind of water or atmosphere, helps loosen a stubborn adhesive’s grip on the shelf.

Fill a spray bottle with hot tap water. Spray the water over one area of this shelf liner, focusing on a front corner that’s easiest to achieve. Permit the water to sit down for a moment or 2.

Slide the blade of a utility knife or craft knife below the corner of their shelf paper till you are able to hold the substance between your fingers. If the corner won’t appear, slice through the material and pry it up close to the corner with the knife blade.

Grip the shelf newspaper with one hand, pulling the newspaper upward and back over itself to peel it off. Spray water in which the paper meets the shelf to loosen the adhesive as you pull the newspaper, ongoing until the shelf paper comes off.

Wipe the top surface of the shelf newspaper dry with paper towels if it becomes stuck somewhere during the peeling process. Hold a hair dryer set to a warm putting a foot or so away from the shelf newspaper, heating the places nevertheless stuck to the cabinet as you pull in the shelf newspaper with your free hand. Move the hair dryer as you work to prevent melting the vinyl in 1 spot. If the adhesive still has a strong grip on portions of the cabinet, jam a putty knife between the newspaper along with the cabinet surface to loosen the bond. Keep on heating and pulling until the paper comes from the shelf.

Put some vegetable oil to a paper towel or rag. Rub the oil over the sticky residue left behind on the shelf, and let it sit for several minutes. Scrape the residue away with a putty knife or scrub brush. Wipe the oil off with dry paper towels, then clean the cabinet surface with a damp sponge.

See related

How to Make Holes in Flower Pots for Water to Run Out

Locating the ideal flower pot in the shop, and then picking it up only to discover there are no drainage holes in the grass is a disappointing experience. Drainage is critical for plants to allow air movement around the roots and keep dirt from getting waterlogged, drowning the plant. Once a plant’s roots begin to rot, there’s usually nothing which can be done to save the plant. Fortunately, if you can use a drill, you may produce your own drainage holes, expanding your potting chances.

Determine the proper bit for your planter. Use a normal bit for plastic and metal pots, a masonry bit for unglazed ceramic pots and a glass or tile bit of glazed ceramic pots. Insert the proper 1/2-inch bit into the drill.

Expand paper on a level drilling surface. Set the pot upside down on the newspaper.

Mark the spots you plan to drill. You need a minumum of one drainage hole, which is usually put in the middle of the grass base. You may add more holes to get large-diameter pots, like three holes arranged in a triangular pattern. Keep holes at least 1 inch from the edge of the grass, and about 2 inches in the other holes.

Press a little indentation into the marked place having a nail to stop the bit from slipping away from the place on a smooth surface. If you are drilling a glazed ceramic pot, cover the drill place with a bit of painter’s tape or a couple of layers of masking tape to help keep the bit in place.

Put on safety goggles to avoid debris or dust of the grass from getting into your eyes as you drill.

Put the drill bit in the indentation you made, holding the drill so the little bit is perpendicular to the grass base. Apply light pressure as you drill at the slowest speed. Do not try and drill too fast, or you risk damaging the grass and the drill bit. Duplicate for each hole you wish to drill.

Remove the tape if you used any. Wash the drilling deposits from the pot holes.

See related

Making Homemade Candles Last Long

Making your own candles isn’t just economical, it’s also fun. Whether you are making candles for emergency use or to add a decorative element to your living room, durable candles are especially beneficial. A few strategies and techniques can be followedboth while you’re making the candles and as you’re burning them–to ensure the production of long burning candles which provide secure, low-cost light for hours to come.

Ingredients Matter

In order to make the best candles, you need to begin with the best ingredients. Soy wax, which can be made from hydrogenated soybean oil, and beeswax will be the two longest lasting keratin. While beeswax typically lasts more, it’s more difficult to work with because it’s an extremely high melting point. Soy wax is cheaper and easier to work with as an ingredient. An added benefit of choosing beeswax or soy wax – they are environmentally friendly as they are renewable. Paraffin, another popular candle component, is constructed from oil, and is bad for the environment.

Just Say Freeze

Once you’ve completed the candle-making process, there is a simple way to extend the life of the candles – freeze them. A wick can be complicated to light in case it freezes; by wrapping the wicks in aluminum foil, it is possible to protect them from damage. After you guard the wicks, cover the candles carefully in plastic wrap, then pop them in the freezer before use. Even just another hour or two will assist the candle burn more because the wax will burn at a lesser rate.

Salt of the Earth

Table salt has many uses, and here’s one more to increase the record – extending the life of the homemade candles. While this process may appear complex, it is able to make your candle last up to twice as long. First, light the candle. After the wax has melted and pooled under the wick, blow it out but be prepared to move quickly before the fluid solidifies. Sprinkle a pinch of table salt at the flux fluid, making sure it mixes with the wax and doesn’t just sit on the surface. With the added salt, the wax will melt far more slowly. By repeating this process with each use it is possible to always extend the life of the candle.

Burn Baby Burn

Candles that burn unevenly also burn quickly. Many people don’t understand this easy trick that applies to store-bought as well as homemade candles. By maintaining the wick trimmed to 1/4 of the inch, the candle will burn evenly and last longer. Additionally, if you place a candle in a drafty location, it won’t burn evenly. By maintaining your candles from prying areas, such as doors and windows, you can not just improve safety, but also extend the life of the candles for a longer, more enjoyable burnoff.

See related

How to Repair & Repaint Steel Doors

A steel door is durable and secure, and it doesn’t rot or warp like wood. However, over time, the finish can dull or you might change your home’s exterior and decide to provide your steel door a fresh coat of new paint. You may run into issues if your door is dented or contains holes caused by rust. The good thing is that most homeowners can do these repairs and refinish a steel door themselves.

Place the end of a screwdriver under each hinge and then tap with a hammer to pop out the hinge pins and remove the door from the frame. Put the door flat, such as on a set of saw horses.

Wear protective clothing, a painter’s mask, safety glasses, and rubber gloves before you begin refinishing your door.

Remove the screws securing the door’s kick plate using a screwdriver. Scrape away loose parts of paint using a paint scraper and mud any rust patches down to the bare metal with 60-grit sandpaper.

Smooth the sanded areas having 150-grit or finer sandpaper and wipe away sanding dust with a tack cloth.

Wash the door with light soap and water to remove dirt, grease and debris and then rinse thoroughly with clean water.

Sand dents and the area surrounding holes or scratches down to the bare metal using coarse sandpaper, such as 80- to 150-grit. The coarse sandpaper will leave scratches, but they produce a surface that will hold your stain material.

Wipe the door using a tack cloth to remove sanding dust.

Implement auto-body stitch into the damaged areas utilizing a plastic putty knife. Auto-body filler is a two-part resin that must be mixed prior to use. Follow the manufacturer’s directions for this procedure, and once the pieces are mixed, spread the filler into the damaged area and press it smooth until the stain is slightly higher than the surface of the door.

Let the putty cure for about half an hour and then sand the stain, first using 80-grit sandpaper on a rubber sanding block, then 150-grit paper, sanding until the stain is almost level to the steel.

Finish sanding with 400-grit wet/dry sandpaper wrapped around a sanding block. Sand the patch till it is level with the surface of the door, feathering the edges.

Scrape loose paint from the door using a paint scraper. Wear just the paint that’s loose. Feather the edges using 150-grit sandpaper to smooth the finish. Scuff sand the rest of the door with fine-grit sandpaper to prepare it for cushion.

Apply a latex or oil-based primer specifically formulated for metal, using a brush or a sprayer.

Sand the dried primer gently with 150-grit sandpaper to remove high spots and drips and also to scuff the surface of the door.

Apply at least one complete coat of latex or oil-based enamel paint to complete the door by means of a roller or a brush.

Let the paint dry overnight and then apply a thin bead of silicone around the top and sides of your kick plate. This may seal the plate so that moisture doesn’t flow behind and cause rust.

Put the plate on the door so the screw holes line up over the existing mounting holes at the door and reinstall the screws.

Reinstall your door at the frame, replacing the hinge pins in the top and in the bottom.

See related

Painting Over Old Painted Pine Boards on Walls

Completing a pine wall with paint may give your room a completely different feel. Natural knotty pine is rustic and a little bit state — but when the rest of your decor doesn’t mesh with this, you don’t need to scrap your personality and start buying primitives. You may create above the pine, even if it’s been previously painted. Your biggest decision aside from color is whether or not you would like to get the knots to show through the paint. A few handy tricks can disguise the knots so well that only you will know that pine resides under the newly painted finish.

Wash the walls with a powerful cleaner, such as trisodium phosphate. Wipe the walls down to remove all traces of cleaner and let the wood dry.

Determine what type of paint is currently on the walls so you know what type of paint to work with. Rub a rag soaked with denatured alcohol in an inconspicuous spot. If a paint comes off on the rag, then the paint is latex. If no paint comes off, then the walls are covered in oil-based paint. It is possible to apply latex primer and paint over oil paint, but you can’t use oil primer and paint over latex paint. In this case, you’ll need to use latex.

Sand the walls to rough up the surface of the paint to prepare the timber to get latex- or oil-based primer.

Wipe away dust using a tack cloth.

Turn around the ground, windows, doors and baseboards to protect them from primer and paint. Remove curtain rods and switchplates using a screwdriver. Place plastic or canvas dropcloths on the ground to protect it from drips and spills.

Scrape wood filler from the container using the corner of the putty knife, and apply it in a thin layer to some cracks or bigger knots that you want to hide on the walls. Smooth the wood filler with the long, flat edge of the putty knife, scraping away any surplus that’s left on the timber. Let the wood filler dry in accordance with the manufacturer’s directions. If you want the knots to demonstrate through the painted finish, then do not use wood filler.

Sand the spots that have wood filler to ensure the surface is smooth. Wipe away any dust with a tack cloth.

Employ a primer coat to the walls, and allow it to dry in accordance with the manufacturer’s directions. Apply a second coat to guarantee the pine boards are adequately primed. If you’re using oil-based primer, then you might need to let the primer heal for an elongated period of time — check the manufacturer’s info for paint-drying particulars.

Paint the walls with the latex- or oil-based colour of choice. Let the first coat dry in accordance with the manufacturer’s directions and apply a second coat. Once the walls are almost dry, then remove the painter’s tape — this ensures you do not pull off any paint when you remove the tape.

See related