Plants for Edging a Fence

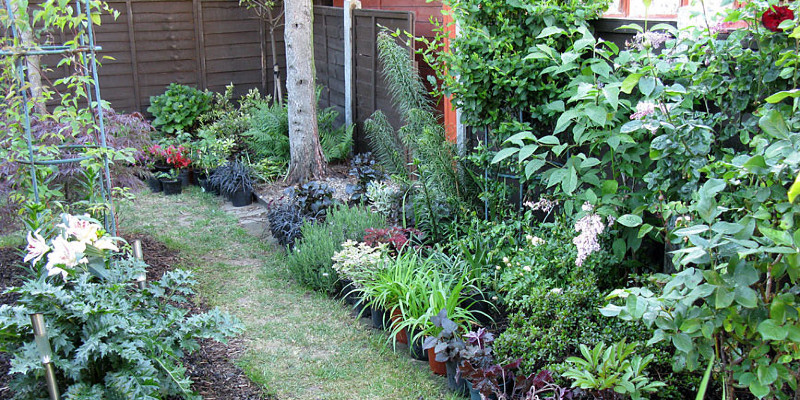
Nothing brightens up a dull fence over a bright, active border next to it. Plant a variety of plants to maximize interest and provide all-year-round shade. You may just access fence edges from one side, so shrubs, perennials, ground cover plants, bulbs and other low-maintenance plants are good choices for U.S. Department of Agriculture plant hardiness zones 8 through 10.

Shrubs

Hooker’s manzanita (Arctostaphylos hooker) is an evergreen tree which grows to a maximum of 4 feet. It tolerates drought well, and its pretty pink-white spring blooms are attractive to butterflies. Grevillea (Grevillea lavandulace) is taller, growing up to 6 feet high and 6 feet wide. It’s evergreen, has showy red flowers that attract hummingbirds from autumn through spring, and enjoys full sun to part shade. This tree tolerates poor soil, heat and drought.

Perennials

Perennials last for many years. Naked eriogonum (Eriogonum nudum) bears yellow, white and pink blossoms though July and August. It’s evergreen, with gray-green leaves, and grows up to 3 feet tall. Plant it in a sunny, mixed border, to give an airy effect. Sea thrift (Armeria maritima ssp. Californica) bears pink blossoms in spring. It tolerates drought well and rises to 6 inches wide and up to 1 foot across. This plant enjoys full sun. California fuchsia (Epilobium californicum) includes scarlet flowers through the summer and autumn that are attractive to bees, butterflies and hummingbirds. It tolerates part shade.

Ground Cover

Plant ground cover plants to minimize time spent weeding. Ceanothus (Ceanothus gloriosus) rises up to 18 inches tall and 16 feet wide. It’s dark green leaves and pretty light blue blooms that attract hummingbirds, butterflies and bees. It tolerates coastal winds well. Carmel Sur Manzanita (Arctostaphylos edmundsii “Carmel Sur”) includes light pink flowers through spring and winter, and its dense evergreen growth makes it an excellent ground cover plant. It grows rapidly and tolerates most soil types.

Bulbs

Bulbs are helpful in a mixed border since they require little upkeep, and many die down during part of the year, freeing up space for other plants. Firecracker blossom (Dichelostemma ida-maia) is a hummingbird magnet. Keep this plant dry over the summer and it will reward you with crimson, pendant, tubular blossoms in May to July. It grows best in full sun. Golden stars (Bloomeria crocea) is a sweet little deciduous plant with pretty, yellow, star-shaped blooms in spring. It grows quickly up to 1 foot higher.

See related

Climbing Plants for Courtyards

The walls which surround a courtyard act as supports for climbing plants. Several distinct plants use tendrils to climb up walls, although other plants grow upwards when trained on a trellis. Showy varieties of these plants add a decorative element to your courtyard. One of the best guides when choosing climbing plants is to pick one that matches the lighting conditions. Observe the sun pattern in the area where you want to place the climbing plant.

Flowers for Full Sun

Sunny sites deliver small cooling shade and must tolerate heat buildup. Blue passion flowers (Passiflora caerulea) grow best in U.S. Department of Agriculture plant hardiness zones 6 through 9 with 3- to 4-inch-wide flowers throughout the summer on high-speed 10- to 15-foot-long stems. The blossoms comprise of white outer petals and narrow blue inner petals with rings of white and purple across the middle. The blossoms are followed by oval orange-yellow edible fruit. American wisteria (Wisteria frutescens), a North American native, creates clusters of pale lilac blooms throughout the summer in USDA zones 6 through 9. The fast-growing woody stems reach more than 30 feet along with the plant works well for south-facing walls.

Partial Sun Vines

Partially sunny sites still get about six hours of direct sunlight with a couple hours of cooling shade. “Ramona” clematis (Clematis x “Ramona”) grow large purple summer blooms covering woody vines with deciduous leathery green leaves. This fast-growing vine reaches 10 to 20 feet long in USDA zones 4 through 9. “Theta” narrowleaf Asiatic jessamine (Trachelospermum asiaticum “Theta”), which grows in USDA zones 8 through 10, creates dark green, needle-like leaves using silvery-green markings in the center. This 20-foot-long evergreen vine grows fragrant white blooms all summer.

Partial Shade Vines

Plants that grow in partially shady conditions require protection from hot afternoon sun that could hurt the plants. “Ritak” sausage vines (Holboellia latifolia “Ritak”) form clusters of purple spring flowers using a cinnamon odor and big lavender fruits follow the flowers. Dark evergreen leaves cover the 15-foot-long stems in USDA zones 6 through 10. This vine demands support to climb erect. “Tangerine Beauty” cross vine (Bignonia capreolata “Tangerine Beauty”) grows in USDA zones 6 through 9 using peach-pink, trumpet-shaped flowers with orange throats growing on 30- to 50-foot-long woody stems. This vine attracts hummingbirds into the courtyard.

Full Shade Plants

Shade-loving plants burn and wither when subjected to a lot of direct sunlight. These plants need the coolness of colour to survive and grow well on north-facing courtyard walls. Red Wall Virginia creeper (Parthenocissus quinquefolia “Troki”) grows best in USDA zones 3 through 8 using tendrils to climb up the wall and reaching 30 feet tall. This deciduous vine produces dark green leaves, which turn fire-engine red in the fall, along with small clusters of blue berries. “Taiping Shan” evergreen climbing hydrangeas (Hydrangea integrifolia “Taiping Shan”) creates glossy evergreen leaves along a 30- to 40-foot-long stem with early summertime white lacecaps made up of tiny blooms in USDA zones 7 through 10. This hydrangea blooms well in the colour.

See related

Aluminum Pan Roof Repair

A modern aluminum pan roof can offer several years of maintenance-free provider, but older roofing can eventually show signs of leaking or corrosion. In addition, exposure to years of direct sunlight can fade or damage painted finishes and lead to unsightly flaking or peeling. Fortunately, any of these problems can be repaired by an experienced do-it-yourselfer equipped with everyday tools.

Loose Seams

When installed correctly, a metallic pan roof is held together by galvanized fasteners folded tightly into leak-resistant neoprene washers. If the screws or nails become loose, water will seep through the space to the surface beneath. In many cases, you can resolve this issue simply by tightening the screws or banging the nails back to place. If the fasteners or the adjacent roof show any signs of corrosion, replace them with new galvanized fasteners and neoprene rubber washers, and then apply a clear sealer over the screw or nail head.

Leaky Flashing

Your aluminum pan roof can be damaged by wind uptake, expanding winter ice conditions along with the nesting of wild animals. Any of these situations can cause the roof panels to pull away in the flashing, which channels rainwater to the surfaces beneath. Scrape out any debris or dirt in the affected area before applying a generous coating of roof cement or a urethane adhesive/sealant. In most circumstances, the urethane will dry and cure more quickly. Apply weight to the newly sealed region for about 24 hours or as directed by the manufacturer’s instructions.

Metal Corrosion

If the roof has been installed using old-fashioned lead washers or non-galvanized nails or screws, those fasteners will corrode over time and that corrosion could spread beyond the hole. If that’s the case, you should plan on replacing the original fasteners to stop widespread corrosion. Use a stiff wire brush to remove all the visible corrosion, and fill some soft spots or tiny holes in the aluminum with a epoxy patching compound.

Failed Coating

Contemporary aluminum pan roofs incorporate a factory applied finish, however that protective coating will surely fail before the aluminum itself because of sunlight exposure and also the repeated expansion caused by heat and cold cycles. Signals of failure include fading, chalking, flaking and peeling. You can repair the issue using a new coat of elastomeric paint in a cool roof color. These coatings are far less prone to premature failure in temperature variations, and in addition, they reduce summertime heat transmission into the living room beneath.

See related

Bronze Flatware Cleaning

Copper, zinc and tin include the bulk of authentic bronze flatware, causing a dusky gold finish that’s occasionally enriched with a chemical or lacquer. Improper cleaning or a lack of cleaning can scratch the delicate surface and alter the appearance of the metal. Regular dusting, light polishing with a fabric to enhance shine, and washing with a mild dish detergent is generally sufficient when caring for bronze. Lacquered bronze, including fresh flatware, rarely requires polishing; however, unlacquered bronze, including several antiques, will develop a green patina that you are going to have to remove.

Caring for Display Items

Although you wo not have to wash lasagna debris off ornamental bronze flatware, allowing dirt and dust to build up does just as much harm as leaving behind specks of marinara. Wipe down bronze utensils with a soft flannel cloth to remove dust, and regularly dust the screen area, preferably once a week. Take a little extra time every month when dusting and utilize a flannel cloth to gently polish the metal. Don’t use a lot of elbow grease or see to the flatware like silver; only buff gently in circular motions as though you were applying lotion to your baby’s skin. If the dirt accumulation is extensive due to lack of dusting, place the utensils in around 12 cups of warm water mixed with 1 tbsp of salt. Don’t allow the flatware soak; rather, utilize the saltwater alongside a soft sponge to wash each piece. The salt dislodges dirt and gently buffs away sticky dirt. Rinse each piece thoroughly once you are completed, and dry them gently with a lint-free fabric.

Cleaning Functional Flatware

Wash flatware used for dishes after every use with mild, phosphate-free dish soap, warm water and a soft sponge or rag. Always hand-wash bronze flatware; the heat from the dishwasher and abrasiveness of this water and detergents will ruin the pure color of this metallic and mar the surface. Stay away from water stains by rinsing the flatware and drying with a soft fabric. When desired, gently buff the metal with a flannel cloth before storing to polish the surface.

Polishing Bronze

Decorative and functional non-lacquered bronze flatware require polishing on occasion, but regular dusting and proper cleaning minimizes how frequently it wants a fantastic buffing. When polishing becomes necessary, due to an extra darkening of the bronze or the development of a green patina, a mixture of whiting and distilled water works as a cheap yet powerful DIY polish. Create a thin paste with the two components; scoop some up with a flannel cloth and buff the glue into the bronze till it shines. Wash the wax off thoroughly; dry the utensil having a fabric and finish up by dry polishing with a clean flannel fabric. If the patina is particularly excessive, then you might want to resort to your store-bought bronze wax; even in case you are cleaning flatware which you eat with, make sure anything you buy is food safe. Tip: In case polishing doesn’t eliminate the patina, the bronze is likely lacquered.

Keep in Mind

Bronze has a high percent of copper, which is very soft. Avoid abrasive polishes and cloths, as they can scratch the surface. If lacquered bronze develops a green patina, take the flatware to your professional for polishing. Don’t attempt to strip the lacquer by yourself. Extra exposure to moisture damages the metal; for this reason, store bronze flatware at a climate-controlled area and avoid soaking the flatware in water, also when brushing. Store the pieces safely by wrapping them in a soft flannel fabric.

See related

Plants That Grow Next to an Elm Tree

Elm trees (Ulmus spp.) , usually grown as shade trees, also work as both specimen and trees. Several elms show allelopathy, a procedure where roots, leaves or shoots secrete chemicals that kill or severely retard the growth of plants growing nearby. When selecting companion plants to develop alongside or beneath elms, be sure to know which type of elm you have. Decorative mulch may work best under elms using allelopathic trends. When selecting companion plants to get non-allelopathic elms, pick those are shade-tolerant and shallow-rooted.

Toxic Varieties

In regards to the plant fluids secreted by elms, not all trees in the genus are created equal. University of Georgia categorizes American Elm (Ulmus americana), which grows in U.S. Department of Agriculture plant hardiness zones 3 through 9, as generating chemicals in its roots, stems and leaves that have the strongest allelopathic effect. By contrast, Chinese elm (Ulmus parvifolia), which grows in USDA zones 4 or 5 through 9, based on the variety, had just minor allelopathy through substances secreted from roots.

Summer and Spring Companions

When planting under or following non-allelopathic elms, like winged elm (Ulmus alata), which grows in USDA zones 6 through 9, or Siberian elm (Ulmus pumila), which grows in USDA zones 4 through 9, consider small daffodils, like “Tete a Tete” (Narcissus “Tete a Tete”), which develop in USDA zones 3 through 9, that flower before the tree leafs out. Virginia bluebell (Mertensia virginica), a perennial, spring bloomer with blue blooms will even boom under elm trees. Hardy in USDA zones 3 through 8, bluebells defy the toxins secreted from other trees and may succeed under the marginally allelopathic Chinese elm also.

Summer and Fall Planting

Shallow-rooted and comparatively low-growing, lily turf (Liriope muscari), which grows in USDA zones 5 through 10, features spikes of purple flowers in late summer through early autumn. Sometimes, the long, grassy leaves arch in rounded clumps. Lily turf thrives in the same consistently moist soil which most facilitates elms and tolerates the tree’s shade. Traditional hostas, or August lily (Hosta plantaginea), which grows in USDA zones 3 through 9, will also perform nicely alongside or beneath elms. The plants include broad, textured leaves and in late summer create substantial, scented, white blooms atop tall stems.

Planting Under Elms

When planting alongside or beneath elms, dig carefully so you don’t disturb the tree’s roots. Probe gently using a trowel or small spade to find planting holes which lie between roots. Tree roots also use the vast majority of the water and nutrients from the ground around them, so mulch nearby plants with several inches of organic matter to conserve moisture and block weed growth. If you experiment with companion plants beneath or close allelopathic species, like American elm, watch carefully for signs of toxicity like yellow leaves. Remove affected plants promptly.

See related

What to Do About Ants & White Stuff On My Poinsettia Plant

As perennials, poinsettias (Euphorbia pulcherrima) brighten late-season Mediterranean-climate gardens in U.S. Department of Agriculture plant hardiness zones 9 through 11. In colder areas, they’ve become fundamentals of indoor winter decorating schemes. Thus a mysterious white material and streams of ants covering your poinsettia’s flame-red bracts and pine-green leaves are nothing if not alarming. The prisoners accountable are messy, sap-stealing insects. Without quick therapy, they might doom your own plant.

Fulfill the Mealybugs

As tender-stemmed plants, poinsettias are favorite feeding sites for pink hibiscus mealybugs. The pinkish insects conceal themselves under a protective layer of wax. As a result of the wax and their heavenly white egg sacs, the mealybugs resemble bits of cotton fluff scattered over the poinsettia’s leaves and stalks. Adult mealybugs overwinter on poinsettia leaves and stalks or in the soil around the plants. Their newly hatched larvae crawl out of the egg sacs to start feeding. Breeze and ants also carry them to new locations.

Detect the Damage

The mealybugs feed by sucking the sap leaf and stems. In the process, they also inject toxic, leaf-curling saliva. Twisted stems, stunted development and failure to blossom all point to their presence, and a badly infested poinsettia may die. The insects have another annoying habit: They excrete undigested sap as sticky, transparent honeydew, a sugary waste which lures hungry ants to the plant.

Annihilate the Ants

Ants are voracious honeydew feeders, and you’re going to have them on your own poinsettia so long as your plant has mealybugs. To control the ants, place sugar-based, boric-acid-laced ant bets along the ant trails leading to your plant. When they come to collect the honeydew, some of the ants may also transport the lure back to their nests, in which it can slowly poison the entire colony. It may be more than a month before your poinsettia is free of their ants.

Ax Them With Alcohol

While awaiting the ants to evaporate, combine your baiting campaigns using a direct assault to the mealybugs. Chemical insecticides do not penetrate the insects’ wax covering. To do the task, spray on your poinsettia till it drips with a solution of 1 quart of water, 1 cup of rubbing alcohol and one tsp of insecticidal soap concentration. The alcohol dissolves the adult bugs’ waxy coating so they die, and the insecticidal soap suffocates the larva and eggs. Duplicate the application daily or every other day till the mealybugs are eliminated.

Wash Them Away

Pink hibiscus mealybugs are capable of reproducing several times per year. After you’ve eliminated an infestation, then track your poinsettia frequently. At the very first indication of a new infestation, then place your garden hose attachment to fine and also direct the spray to the backs of their leaves and the stems. For optimum effectiveness, spray in the early morning for 2 consecutive days.

See related

What Pepper Can You Put on Seed So Squirrels won't Eat It?

The fruit sometimes referred to as bird pepper (Capsicum annuum L.), that is a perennial in U.S. Department of Agriculture plant hardiness zones 9b during 11, is harmless to birds, but it can pack a mean punch for marauding squirrels at bird feeders. If you want to put squirrels from the hot seat in your feeders, combine ground varieties of bird pepper with the seeds.

How it Works

Bird pepper is only one of the ordinary names of numerous peppers from the Capsicum genus. These peppers range in pungency because of varying levels of capsaicinoids, primarily capsaicin. Paprika contains capsaicinoid speeds up to 30 parts per thousand, while some red peppers have concentrations of 13,000 parts per thousand. Cayenne pepper, which is commonly used as a squirrel deterrent, is ground from a mixture of some of the very pungent varieties.Mammals, such as people and squirrels, have brain receptors that react to the capsaicinoids in onions with a sense of burning. But because birds lack these receptors, as well as having no sense of taste, they’re unaffected.

How to Apply It

Scatter ground cayenne or dried red pepper flakes onto birdseed and blend it into the seeds. If the wind is strong enough, however, it may blow the ground pepper from the feeder. Optionally, spray the bird seed with an aerosol kitchen oil product, or use a non-aerosol mister to use the oil, prior to applying the pepper so that it clings to the seeds. But rain may wash pepper from the seeds even in the event that you’ve implemented oil, and that means you have to continue adding pepper into the seeds to deter the squirrels.

Feeding Habits

If you notice an inordinate number of seeds lost from your bird feeder compared to the number of squirrels you begin eating there, chalk this up into the squirrels’ hoarding behaviour. Squirrels eat some of the seeds, however they also cache seeds and other foods to have a winter food supply. Squirrel activity in your feeders can ramp up from the autumn because it is the time of year they actively shop food for the winter.

Precautions

Should you employ ground pepper into bird seed, avoid breathing in the powder. And if you handle pepper powder or fluids, wash your hands with soap and water immediately afterward, or wear gloves so that you do not forget and rub your eyes. Because squirrels have broken their eyes from rubbing them after managing hot pepper, The University of Nebraska Lincoln urges other deterrents for squirrels, primarily using exclusion feeders, which permit the birds in but keep the squirrels out. Kinds of exclusion feeders include people who have cages, baffles and weighted hoppers.

See related

Hydroseed vs. Regular Seed

Growing a wholesome lawn from seed is a time-consuming and time-consuming procedure, regardless of what seeding method you choose. Hydroseeding, however, offers several advantages which make it a faster and easier alternative to conventional hand-seeding methods.

Hydroseeding Process and Cost

The hydroseeding process involves using a mixture of grass seed, wood-fiber mulch, fertilizer and binding agents, all of which are mixed with water to generate a semi-liquid slurry. A carpet contractor sprays the mixture onto the ground using a hydraulic sprayer. Hydroseeding differs from hand isolating or dry seeding in that each one of the components are implemented at the exact same time; together with the hand-seeding method, seed, mulch and fertilizer are implemented one at a time in many steps. Hydroseeding is more expensive than traditional hand seeding, but it’s considerably more affordable than installing sod.

Germination Time

Thanks to this absorbent fiber mulch and the binding agents which hold the hydroseed mixture together, the grass seed remains in continuous contact with the humidity in the mulch. That factor can help to speed seed germination, and hydroseeded bud seed sometimes germinates in less than one week. Hydroseeded lawns are typically ready to mow after three to four weeks, generally sooner than a seeded lawn.

Moisture Retention

The fiber mulch in a hydroseed mixture carries a significant amount of water across the seed, which means that a hydroseeded lawn requires less maintenance and care in terms of irrigation, at least initially, than the usual hand-seeded lawn. Even a hydroseeded lawn might not have the ability to retain moisture adequately during prolonged dry periods, however, and it could require supplementary irrigation. Additionally, the fiber mulch in a hydroseed mixture breaks down quicker than a traditional mulch like straw. So it won’t supply its moisture retention benefit through an entire growing season.

Erosion Resistance

The binders and fiber in the hydroseed mixture form a solid mat once the mixture dries, and this mat can help to prevent the seed from being washed off by water or blown off by wind. The solidified mixture also holds onto the ground surface, and it could help to stabilize the soil, limiting erosion.

Fertilizer Content and Mulch Decomposition

A hydroseed mixture contains fertilizers that are acceptable for the varieties of grass seed in the mixture. Since the fertilizers are applied at the time of seeding, they eliminate the need for the further fertilizer step that hand seeding demands, which erases a concern about the timing of that fertilizer application. After the hydroseed mixture’s fiber mulch decomposes, it also adds nutrients to the ground.

See related

What Happens Within a Pine Tree's Female Cone?

When they’ve finished their reproductive lifetime, pine cones (Pinus spp.) Become Christmas decorations, gas for fireplaces or craft objects. Pines are. They have both male and female cones, with the cones plant seeds. As with other gymnosperms, the seeds differ from flowering plants because they aren’t surrounded by an ovary that makes a fruit for seed dispersal. The seeds lie in the open, wedged between the scales of the cone. Pine cones require two years to develop, eventually become fertilized and produce seeds, and it’s a complex story.

Formation Begins

In spring, generally higher in the blossom, the hints of some pine tree branches, grow small, green, female cones. They are thought to be derived from branches that have modified scale-like constructions rather than leaves. Each scale has two ovules on its hand, and each ovule develops into a seed. Because the cone is tiny, everything is on a small scale in this stage. Within the ovule, cell division occurs at a technical structure toward the base of the ovule known as the nucellus. It divides to form the female sex cell or gamete.

Pollination Occurs

Cones type producing pollen. Pollen floats on fluid near the tip of this scale on the wind into the female cone and lands. The scale tip opens marginally to let the pollen. The pollen rests there for a year. The female cone expands into a hard structure using the scales. Changes are occurring in the pollen and the ovule, although fertilization will not happen until the spring. The cells are dividing to produce the gametes, semen that is known as, and female gametes, known as eggs, that will unite to produce the seeds.

Fertilization Follows

Throughout the spring of the next season of this cone, the male and female gametes are ready. The pollen develops a pollen tube, which enters just a little hole at the ovule’s skin near its basal end, known as the micropyle. The semen goes, and the tube enters the ovule down the tube and to the ovule. Fertilization occurs when egg and the sperm fuse and the seeds grow. Each seed includes food to nourish it, in addition to the embryo of a young pine tree.

Maturation and Seed Dispersal

The female cone develops as the seeds grow, getting browner and larger. If the seeds are mature, the scales of the cone start to separate from one another, becoming sterile, dry and brown. You can see two seeds resting at the top of each scale When you look between the scales. There’s enough space for the seeds to drop out. Depending upon the species seeds are light and winged and have carried by the wind, or they are heavy and nearly wingless and have dispersed by creatures. A good example of a walnut with winged seeds, Afghan pine (Pinus eldarica) is hardy in U.S. Department of Agriculture plant hardiness zones 6 through 11. The Italian stone pine (Pinus pinea), which develops in USDA zones 7 through 11, releases large seeds used as food. They are an important element in cooking.

See related

When Do You Make an Amaryllis Go Dormant?

Amaryllis (Hippeastrum spp.) Grows in U.S. Department of Agriculture plant hardiness zones 8 through 10, where it flowers naturally outdoors in summer. Indoors, amaryllis can blossom in winter or early spring should you force the wax into ancient dormancy in autumn.

Time to Sleep

Amaryllis will continue to grow through summer and spring, after flowering is finished. The green foliage is accumulating nutrients in the bulb before it goes dormant, so leave the foliage in place and provide the amaryllis with full sun and moist soil during this time period. For winter or early spring bloom, gradually reduce watering the arc less in late summer and allow the soil to dry nearly entirely. The bulb is totally dormant when the leaves yellow and die back entirely, usually in late summer or early autumn.

Storage Tips

The amaryllis bulb does not require any water through its autumn and early winter dormancy period. Moisture at this time can cause the amaryllis to decay. Turn the pot on its side so that moisture does not collect if you keep it outdoors, or place the pot in a dark area indoors at around 40 to 45 degrees Fahrenheit. Keep the bulb in pressured dormancy for at least two months to ensure healthy blooming. Remove the bulb out of its dormant storage six to eight weeks before you want flowering to start.

Waking Up

An amaryllis will grow best in a small bud, however, the dormant bulbs needs repotting if the surfaces of the arc are touching the sides of the pot. Use a pot with bottom drainage that’s 1 to 2 inches wider than the arc. Water the ground so that it’s evenly moist and transfer the pot to someplace that is around 50 to 60 F with bright, indirect sunlight. Increase the temperature to 70 to 75 F following the leaves grow in, and continue to water the amaryllis when the soil surface feels dry.

Ongoing Care

After flowering, cut back the flower stems to 2 ins high but do not remove the leaves. You can continue to keep the pots indoors, or set them outdoors after frost danger has passed. Amaryllis needs full sun, moderately moist soil and fertilizer during the after-bloom and summer growing season when it is to blossom again following the next dormant period. Water every two weeks with a water-soluble fertilizer, like a 24-8-16 blend diluted in the speed of 1/2 teaspoon for every 1 gallon of water, or according to the speeds on the tag.

See related